Felting has quickly become one of the most beloved arts and crafts activities in recent years, despite still being a niche art form. Felting makes it possible to create adorable soft creations like fuzzy Christmas decorations, and various other ornaments to make your home look super cozy.
Felting is also known for simply being highly relaxing, compressing various fibers together to create a solid shape, providing the activity with a sensory element that makes it so enjoyable. It’s like molding with clay if the clay were wool or other similar materials!
But did you know that there is more than one way to felt? Felting doesn’t just involve poking the fibers with a needle to create condensed shapes, but it can also involve a little bit of water!
You’re likely reading this article because you have found yourself wondering how water could possibly be used in the felting process, and what benefits it could possibly bring to the whole experience.
Prepare to have all of your questions answered, because today we are going to take a deep look at wet felting, and how you can do it yourself!
What Is Wet Felting?
Before we take a look at how you can go about getting involved with wet felting, it would be pertinent to find out a little more about what exactly it is!
Wet felting is a unique form of felting that, of course, involves wetting the materials in order to condense the wool or other material chosen into a specific form.
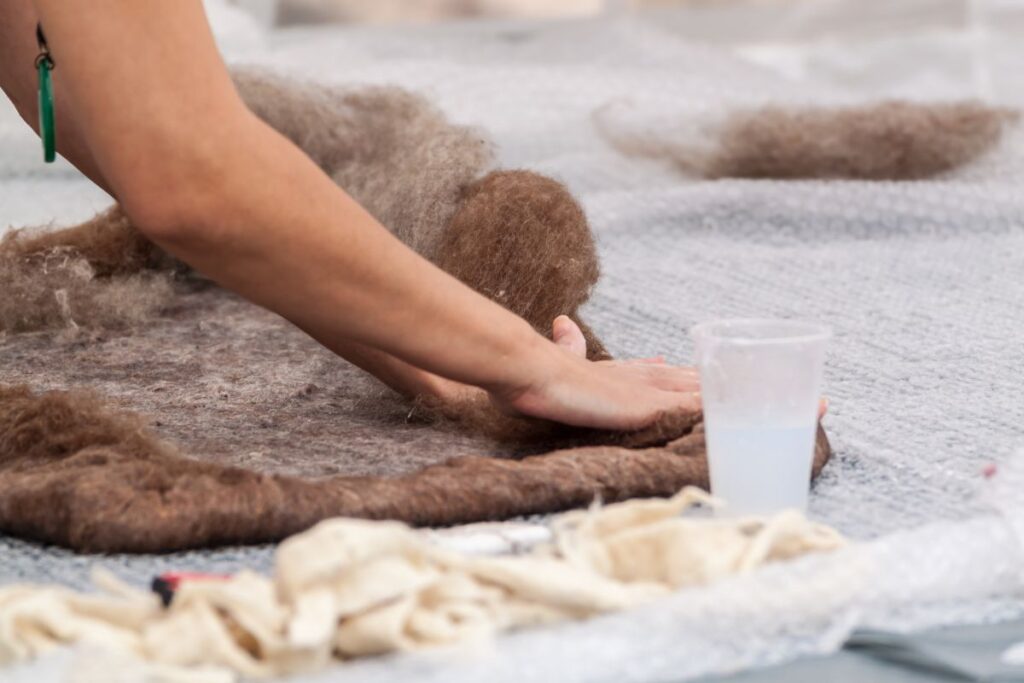
Wet felting is different from needle felting in that it involves placing the wool into some warm and soapy water before then placing it onto a hard surface, and then rolling the fibers around on the hard surface, which causes it to condense down into a piece of fabric.
Once you have finished rolling the fabric, all you then need to do is carefully rinse it, and allow it to dry. We recommend allowing it to dry while hanging, and not to speed up the drying process using a hair dryer.
This is because allowing it to air dry allows the fabric to take on a very soft texture that is more beneficial for whatever it is you plan to make!
What Makes Wet Felting Special?
Now that you have a better sense of how wet felting works, you’re likely wondering what exactly makes the process so special, and why you would bother to choose it over traditional needle felting.
One of the main benefits of wool felting is that it can actually lead to a much softer final texture for the fabric that you create. Using hot water and soap actually causes the pH of the wool or other material to change slightly, which allows them to open up.
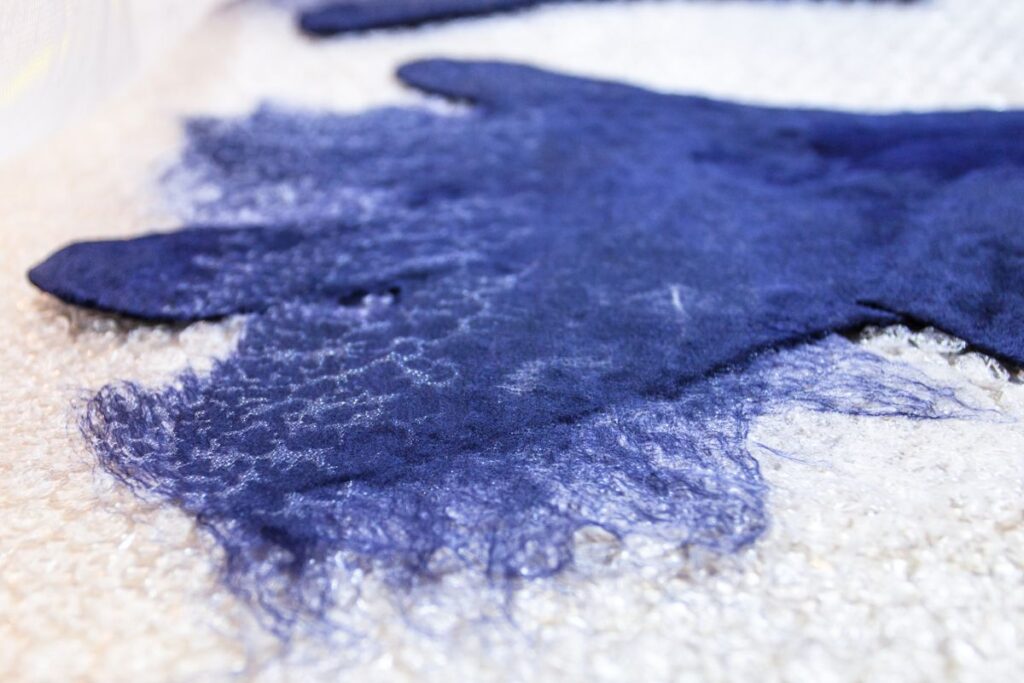
This makes them more likely to bind together, so the resulting texture of the finished fabric will feel much softer. The final product of wet felting may appear cleaner and less ‘frizzy’, as there will be fewer fibers poking out.
Wet felting is also very easy because it uses materials that you likely have access to within your own home, and the combination of water and soap creates lubrication that allows your hands to easily glide over the surface of the fibers, so you can more easily manipulate and roll them up.
As well as this, wet felting is simply incredibly relaxing. The soft sensation of rolling and massaging the soapy felt adds a textural element to the activity that is pleasurable, and helps to focus your mind on the task at hand, allowing it to clear your mind of daily stresses!
The activity can also be slightly messy, as you can involve different dyes to color the fabrics as you work, which can make it incredibly beneficial for young children, and can help them to develop their fine motor skills!
What Is The Difference Between Felting And Fulling?
Regardless of whether you choose to get involved with needle felting or wet felting, you will very likely encounter the terms ‘Felting’ and ‘Fulling’, which are often used interchangeably, despite being two very different things.
To help you to better understand this guide, let’s make sure we know exactly what is meant by the two terms!
Felting
Regardless of which form of felting you get involved with, ‘Felting’ itself is the first stage of the activity, in which you are setting about trying to get the fibers to interlock.
At this stage in the process, you can add in as many fibers as you want, and add more as you see fit with time. At this point in the process, you will likely begin molding out the shape of the end product.
Fulling
Fulling is the second stage of the felting process, and this is the stage in which the fibers of your fabric begin to shrink, which allows them to bind together, to give your final shape better strength.
Fulling will occur during wet felting once the fabric has been set aside to dry, so make sure to keep an eye on your fabric as it dries, to ensure it takes on the correct shape.
At the fulling stage, you will want to make sure not to add any more fibers to the project, as they will not be able to bind properly, which will lead to a less satisfying end result.
How Much Does Wool Shrink When Felting?
In order to create the perfect felting project, you will of course need to take into account the shrinkage that will occur during the fulling process.
On average, you can expect your felted project to shrink around 20 to 50% on all sides, and this range can depend on the amount of fiber you use, and how many layers you condense into the final shape.
If you were to agitate your fibers as much as you can, then the resulting project will shrink much more during the fulling process. If you were to instead agitate the fibers a little less, then it would shrink a little less.
Thus, you will want to make sure to carefully consider how much you want the project to shrink during fulling!
How Do You Know How Much Your Felting Will Shrink?
If you are planning to create a felting project, you will want to find out how much your fibers will shrink, and then plan accordingly. You will want to consider the amount of fibers you plan to use, and the amount of layers you are going to create.
Let’s take a look at an example for how you can calculate the shrinkage of your fabric.
If you were to create a piece of fabric using around 10 x 10 inches of wool, you would want to measure the length of each side of the new fabric you created, and then subtract that measurement by 10, before then multiplying that value by 10.
This will give you the shrinkage percentage, to give you an idea of how much your fibers will shrink during fulling.
If you created fabric around 6 inches on each side, you would take your original 10 inches of wool, subtract the 6, and then multiply the value you get from that sum by 10. So, in this example, you would end up with a shrinkage percentage of 40%!
Now that you know your shrinkage percentage, and how much your piece will shrink during fulling, you can set about gathering the correct amount of material, and begin planning how it will look once finished.
In order to work out how big to felt your object, you will want to make use of the shrinkage percentage you discovered earlier. Let’s say you wanted your final felted project to be around 12 inches long.
You would start by taking the shrinkage percentage, and subtracting it from 1. In this case, your shrinkage percentage would be 40%, so you would do 1 – 40%, which would equal 60%, which is 0.6.
From here, take the result of that sum, and use it to divide the target size of your felted object. So you would take 12 inches, and then divide it by 0.6, which in this case would equal 20.
Therefore, in order to get the perfect 12 inches from your final product, you will want to make sure that your fiber is 20 inches long before felting!
How To Wet Felt
Now that we’ve covered the initial basics, like what wet felting is, and how to prepare for it, it’s finally time to dive right in and find out exactly how you go about wet felting.
Make sure to take your time reading through this guide. Though wet felting is very easy and pleasurable, if you want highly specific results then you will want to make sure to follow each step with care!
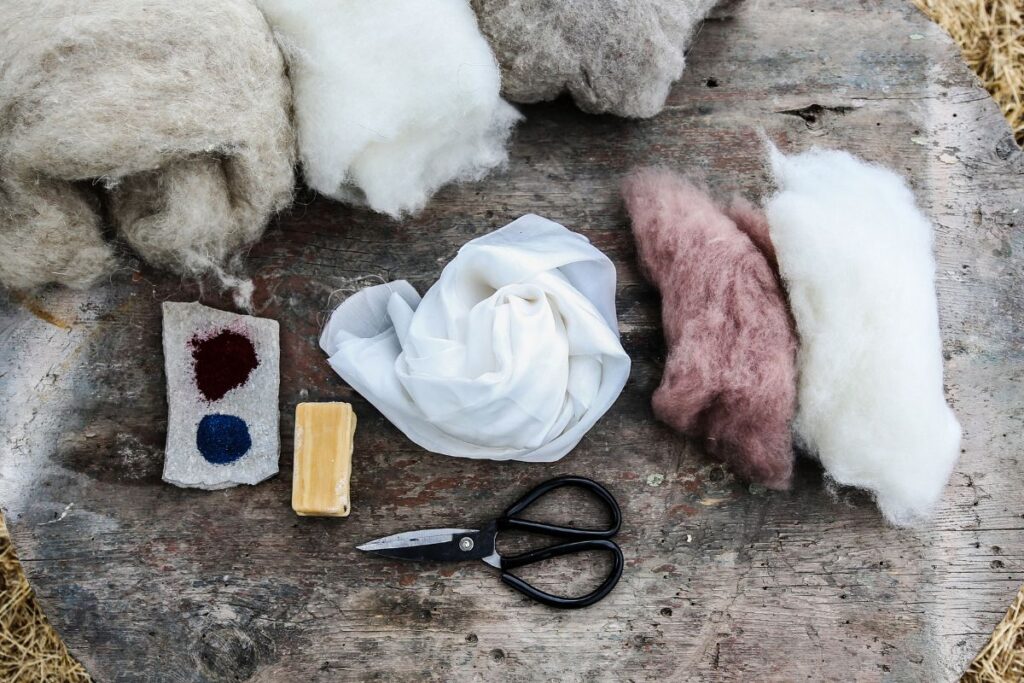
What Do You Need For Wet Felting?
Wool Fiber
Of course, in order to get started with your wet felting, you are going to want to get a hold of some wool fibers! There are numerous options when it comes to finding the perfect wool fibers, and they can easily be purchased at your nearest arts and crafts store, or even online.
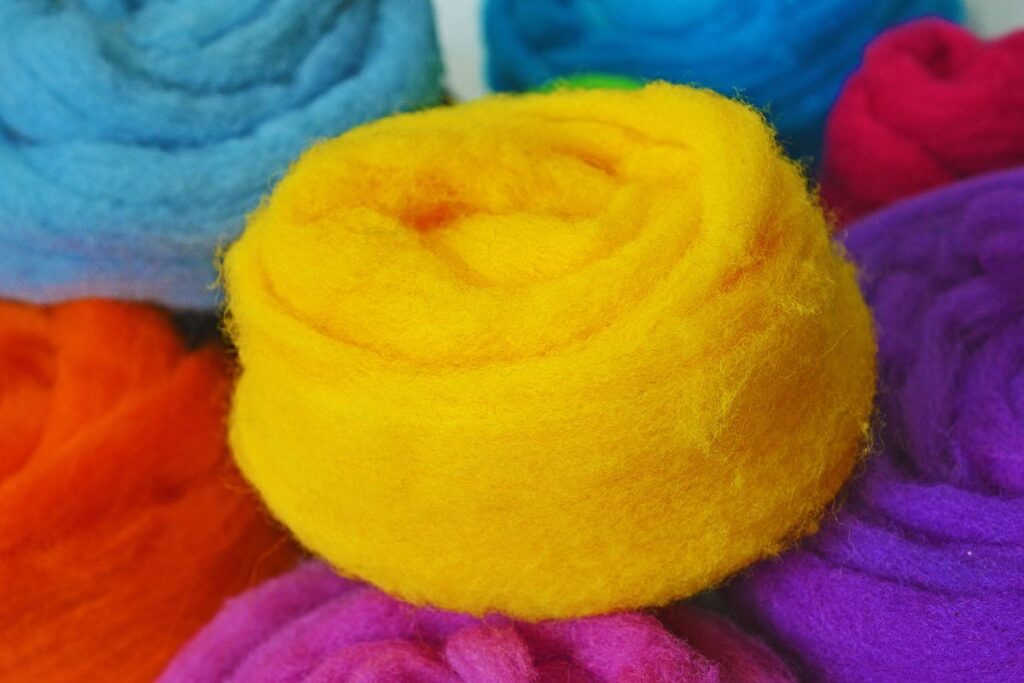
You can either purchase untouched wool fiber or pre-dyed wool fiber that has a specific color. This will depend on if you want a more simple white look for your finished project, or if you plan to dye the wool yourself.
There are also different types of wool and wool that can be gathered from different animals, such as sheep, alpaca, camel, or even rabbit hair!
We recommend getting a hold of some Merino wool if you can. Merino wool is easy to find, very affordable, and has a very soft texture, which makes it great for felting projects.
Make sure not to get ‘Superwash’ wool, as this is wool that has been specially treated so that it will not shrink, which makes it impossible to use for felting projects!
Other Fibers
Alongside your wool fibers, which have a distinct texture and look, you may want to grab some other fibers that you can weave into the project during the felting process to create a unique look or texture!
These can include things like
Bubble Wrap
In order for wet felting to work, you need the perfect surface to rub them on in order to agitate the fibers, causing them to knot together correctly. One of the most popular surfaces for this is bubble wrap.
Bubble wrap is able to provide enough resistance to agitate the fibers, while also being soft enough to not damage them. And who doesn’t love playing around with bubble wrap? This helps to add to the enjoyable and relaxing nature of wet felting!
Bubble wrap is also highly affordable, and you likely have some in some of your old packages from online orders that you can re-use!
Mesh Fabric
We also recommend grabbing some mesh fabric, which is designed to hold the fibers in place as you get to felting. This helps to keep your fibers from ending up all over the place, so none of it goes to waste!
Soap
Soap is one of the most crucial elements in wet felting, but you will want to make sure to grab the perfect soap, and not just any soap you find in your home.
We strongly recommend that you grab some olive oil soap specifically, because it is able to create the perfect conditions for wet felting.
When you are wet felting, you will want to ensure that you do not create too many air bubbles, because these can keep the fibers from intertwining, thus ruining the structural integrity of your finished felted project.
Olive oil soap is known to not produce many bubbles, while still creating the perfect amount of lubrication to make the felting process easy.
Hot Water
Water is the second key ingredient in wet felting, and you will want to make sure that the water is hot enough to cause the fibers to expand and interlock, but also not too hot as to be uncomfortable on your fingers.
You will want to make sure that you do not simply soak your fibers in water, and that you carefully apply the water to the fibers, which brings us to.
A Sponge
You don’t want to simply soak your fibers in hot water and soap, you will instead want to carefully scatter some water over the surface of the fibers. One of the easiest ways to do this is to soak a sponge in soapy hot water, and then squeeze it over the surface of your fibers.
You can also make use of a spray bottle, but using a sponge is best because it allows for plenty of your soap to reach the fibers.
A Pool Noodle
If you want to further agitate your fibers, then a pool noodle can work wonders, as you can carefully roll it over the surface of the fibers. A pool noodle is soft enough to not damage the fibers, but is able to provide enough force to agitate them just right!
A Towel
Once your wet felting is finished, you are obviously going to need to dry it! Having a towel handy to wrap up the project is perfect for helping it to dry after you have finished.
Make sure to grab a towel that isn’t too precious to you, as, if you are planning on using dyes, you should beware that they may leak slightly onto the surface of the towel as the fabric dries!
Vinegar (Optional)
Wool fibers naturally have a small amount of acidity to them, but this acidity is washed away once you introduce water and soap to the fibers.
Once you have finished felting, you can add a small amount of vinegar to the fabric, in order to bring some of the natural pH back to the fibers.
This can help to make the bonds between the fibers much stronger, which leads to a more sturdy finished project. The wool will also feel a little softer!
However, this is entirely optional, and you will want to consider the fact that vinegar will add a slight odor to the finished project that you will likely want to wash away.
Step 1 – Setting Up The Fibers
Gathered up all of the materials you need for your felting project? Then let’s dive in and get started on your wet felting!
The first step of the process will involve collecting all of the fibers that you plan to work with and laying them out with the correct dimensions. Make sure to make use of the shrinkage percentage you worked out earlier to ensure that your finished project comes out at just the right size.
Grab your wool fibers, and begin pulling them apart so that the fibers are more evenly spread out. Don’t worry about ensuring that every fiber is not overlapped by another, as that will take you hours!
Ensure that your fibers are all pointing in the same direction, and then carefully lay them down on top of your pre-laid bubble wrap from earlier. If you are laying down multiple layers of your fibers, or multiple rows, make sure that they overlap slightly so that they can intertwine with one another!
Once you have completed one layer to the dimensions you require, you will then want to start creating your next layer on top by laying down more fibers facing in the opposite direction.
The opposing directions ensure some great intertwining! Keep adding as many layers as you think your project needs. Remember that more layers will lead to less shrinkage, so make sure to carefully consider this!
If you have any embellishments that you want to add, such as
Step 2 – Getting The Water Ready
Now that you have laid out your fibers exactly how you want them to be oriented, you can get to work on preparing the water that you will be using for the wetting process!
Grab a container, and fill it with water that is of a comfortable temperature for your hands. Once you have your water, add in the soap that you are planning to use.
This can either be bar soap, or liquid soap. Once you have added the soap to your water, all you need to do is mix it in until the water is soapy.
Step 3 – Prepare To Use Your Soapy Water
Now that you have the perfect soapy water, take your mesh fabric, and place it carefully onto the top of the fibers you laid down on the bubble wrap.
Once the fibers are covered, you will want to begin spraying the water onto the surface of the fibers. Use your sponge by dipping it into the water, and then squeeze it over the mesh, creating an even coating of water.
You can spray that water onto the surface, just make sure you don’t simply pour the water onto the fibers, lest you drench them too much.
Step 4 – Press Into Your Fibers
Get your hands wet with the hot soapy water, and begin pressing the fibers together carefully by pushing through the mesh fabric.
You will want to make sure to push hard enough to move the fibers around without pushing so hard as to risk damaging the fibers as you work. Your goal at this point is simply to work the water and soap in while not creating air bubbles.
Once you have wet the surface of all of the fibers, take your hands and slowly rub them over the mesh, to create a layer of soapy water over the top of the entire fabric. Once again, keep making sure not to overwork the fibers as you move your hands.
You can carefully peel off the mesh from the fibers intermittently, to check how well the fibers are sticking together, but make sure to be careful if you notice the fibers sticking to the mesh. If any fibers are stuck to the mesh, it could mean that you still need to add some more water before removing the mesh.
Step 5 – Use The Pool Noodle
Now that the fibers are sufficiently wet, carefully place the mesh back down, and grab your pool noodle, because it is time to start rolling.
In order to roll the fibers, you will want to grab the bubble wrap base on one side, and carefully lift it to wrap around the pool noodle. Once the fibers are wrapped carefully over the pool noodle, you can begin rolling the noodle, which will cause the bubble wrap to wrap around the pool noodle.
Once the full amount of fiber has been wrapped around the pool noodle, we recommend laying down your towel, placing the rolled noodle onto it, and then wrapping the towel in place, which will help to keep the bubble wrap in place as you roll.
Once the towel is sufficiently wrapped, begin rolling it on the surface of a table, by using the palm of your hands. Generally, you will want to roll the noodle around the length of your hands, in sets of 25.
Try to aim to get 100 rolls in total. Be sure to give the fibers plenty of time to breathe between sets, so that they do not become overworked, and so that they can relax into their new intertwined positions!
You will want to make sure to roll carefully, so that the fibers do not become overworked, and do not get stuck in the mesh fabric. If you notice the fibers getting stuck in the mesh, simply carefully peel them away, and begin rolling again, just make sure to do so slightly lighter, as you may have been rolling too hard.
Once you have rolled one side enough, simply unroll the fabric, and flip it over, before beginning the rolling process again. This will allow you to make sure that all of the fibers are intertwined sufficiently.
Step 6 – Check The Fabric
At this point in the process, once you have rolled the fabric numerous times, you will want to check that the fibers have intertwined well enough to create a strong fabric.
Carefully peel off the mesh fabric from the fibers, making sure to look out for parts of the fabric that are stuck to the mesh. At this point, the mesh should peel off very cleanly from the fabric.
Once you have peeled the mesh off, carefully pinch the finished fabric and pull it up slightly. By doing this, you are checking to make sure that the fibers are intertwining well enough to create a strong fabric that stays together even when moved around.
If you notice individual fibers coming up, or the fabric does not move as one unit, then you will want to keep felting before you can begin the fulling process!
Step 7 – Fulling
Once you have created a single piece of fabric using your fibers, it’s time to begin the fulling process.
At this point, you can take away the bubble wrap layer carefully, and then return to wrapping the fabric around your pool noodle.
Once the fabric is wrapped around the pool noodle, you can begin rolling it around again. When rolling the fabric during the fulling process, you can apply a little more pressure, because the goal here is to slowly dry the fabric, and cause the fibers to shrink down.
When you finish rolling the fabric, be sure to flip it over, and roll it on the other side!
As you continue rolling the fabric, you may begin to slowly notice it shrinking. Make sure to account for this and unroll the fabric periodically so that it does not become stretched by the pool noodle.
Simply keep rolling the fabric, until it has shrunk down to the size that you are aiming for!
Step 8 – Rinsing
Once you have helped the fabric to shrink down to the desired size, you can then set about rinsing the fabric, so that it can finish shrinking just as you need.
The best way to do this, and to get rid of some of the excess soap is to run some cool water over the fabric, which causes the fibers to become shocked, which causes them to shrink perfectly and finish the process.
When rinsing, you are trying to get rid of as much soap as you can, so be sure to keep rinsing until you notice that the water begins running clear.
Optional Step – Use Vinegar
At this point in the process, if you wish, you could easily make use of some vinegar to help to bring back some of the acidity to the fibers, which can help to soften the finished fabric.
Fill your container with water, and a little bit of vinegar that has been mixed in. You don’t need much vinegar at all, as the fibers will easily absorb the acidic content, and this helps to prevent the finished project from taking on a sharp and unpleasant odor.
Allow the fabric to soak in this water for around a minute, and then remove it, rinsing out the fabric as you go.
Step 9 – Drying
Now that you have your finished and fulled fabric, you can leave it to dry.
Generally, we recommend that you always allow the fabric to air dry naturally without artificially enhancing the drying process with tools like a hairdryer, as the air drying process allows the fabric to soften up more naturally, resulting in fabric that looks and feels more pleasant!
If you can, we recommend hanging the fabric to dry, so that every side of the fabric can make contact with the air and dry sufficiently.
Are There Any Advanced Techniques In Wet Felting?
Now that you have a solid grip over the wet felting process, you might be finding yourself wondering if there are any more advanced techniques that can be used to create unique effects with the finished felted project.
Let’s take a look at some of the best advanced wet felting techniques.
Pinch And Roll
The pinch and roll technique is a great option if you need to felt a project quickly, however, it involves a little more deft control of your hands, and a little more force, so it is not recommended for beginners, as you may damage the fibers, or end up with fabric that is unsatisfying and unfinished.
This process involves grabbing one side of the fabric, pinching it, and then carefully rolling it up in order to create a roll. Be careful not to do this too tightly, as it is possible to roll up the
fabric too tightly and then risk damaging it.
When you are ready to unroll the fabric, shake it carefully from side to side, which will cause it to unroll, and will also cause the fibers to be agitated, which allows the fibers to intertwine more effectively.
Spot Fulling
When you become more used to wet felting and the processes involved, you may want to start fulling specific sections of a felting project in order to create unique looks for the overall project.
One of the techniques that can help you to achieve this is spot fulling, which involves focusing your attention on a specific section of your fabric in order to full it individually, so that it shrinks at a unique rate.
Spot fulling is also very useful for finishing the corners of a piece of fabric you have created because corners are usually noteworthy for not fulling correctly.
Spot fulling simply involves pinching and creasing a specific section of your fabric, and then unrolling that same section. This causes the fibers to become agitated, which makes them more likely to bind together with one another.
Feel free to also shake that section of the fabric, which will further agitate the fibers, and cause them to pull closer together!
Wadding
If you are happy to create an uneven wet felted project, then this could be the perfect technique for you.
This technique is actually incredibly simple, and can be a great way to relieve some frustrations and let go of some pent up energy! All you need to do is grab your fabric, and wad it up tightly into a ball in your hands.
Once you’ve done that, all you need to do is drop it onto your table, and it will slowly unfurl.
This causes the fibers in the fabric to be shocked, causing them to shrink at a faster rate. However, you will want to keep in mind that the fabric will shrink very unevenly because certain parts of the fabric will experience more shock than others.
This can be great for creating a slightly bumpy surface with your fabric, but if you want to create a totally even and clean surface with your fabric, then this method is not recommended.
Wool Shocking
We touched on wool shocking a little earlier, but in case you want to know a little more about it, wool shocking simply involves taking the wool you are fulling, and subjecting it to hot or cold water during the fulling process.
Subjecting the fibers to intense temperatures helps to ‘shock’ them, which helps them to shrink at a much faster rate. This can be great if you want to speed up the fulling process slightly.
Just make sure that you evenly shock all of the fabric, so that it does not shrink unevenly (unless that is what you want to achieve).
Can You Create 3D Objects With Wet Felting?
So far, we have mostly touched upon the benefits that wet felting can offer when creating flat projects like small pieces of fabric, or larger blankets. However, at this point, you may be wondering to yourself whether it is possible to create 3D objects with wet felting.
Luckily, you can create 3D objects with wet felting, similar to how you might with more traditional needle felting, but you may need to make use of some extra tools in order to create satisfying 3D shapes without making a mess!
You can create 3D objects such as animals with wet felting, provided you start constructing the 3D shape close to the fulling process, after the wool has been fully felted. This will allow you to sculpt the desired shape so that it will shrink and retain that shape.
However, you should keep in mind that using wet felting in such a way will not lead to reliable results quite like traditional needle felting, so if you plan to create a precise shape, such as an animal, you may not want to use wet felting!
Resist Felting
However, there is a great way to create more 3-dimensional shapes, such as pockets and bags with wet felting by using a specific technique known as ‘Resist Felting’.
Resist felting involves performing the standard wet felting procedure, but making use of a solid material that acts as a barrier between certain fibers used to create your fabric.
To use resist felting, simply place the first layer of fibers down onto the bubble wrap, and once they have felted sufficiently, simply place the resist barrier on top of the felted layer, and continue building up the felting around it.
Be sure to overlap both layers sufficiently, so that the finished project does not fall apart. Keep working around the resist layer, ensuring that the fibers are felting together as you go.
Once the fibers have felted together, you can then remove the resist layer carefully, being careful to check that none of the fabric is sticking to it, and no fibers are being pulled away from the final shape. From here, you will be able to continue the fulling process as normal!
Make sure to use a resist material that is resistant to water, as you don’t want to be picking away disintegrating cardboard from your fully felted bag before it starts fulling!
What Does It Mean If The Finished Fabric Has Not Shrunk Fully?
Earlier in our guide, we showed you how to create your own shrinkage percentage, to gauge just how much each of your own projects will shrink, so you can create perfect projects of a size that you expect.
However, sometimes you may find that your wet felting project doesn’t shrink as you expected it to.
If this happens, it is usually the case that the wool fibers have not been felted or fulled sufficiently, and thus they have not had the chance to shrink in the ways that you wanted them to.
In order for your wet felting project to shrink to the perfect size, you need to make sure that you are putting in all of the necessary work in the felting and fulling stages.
When felting, you need to be sure to keep working the fibers until they are properly and firmly intertwined with one another. Make sure to keep checking to see that none of the fibers are sticking to the mesh fabric when you peel it away, and that the fibers are not coming away individually.
Make good use of the pinching technique to check the fibers.
Unfortunately, if your fabric has not fulled as you expected it to there is not much you can do to help the fabric to shrink down to the level that you desire.
You can lightly knead at the surface of the fabric to get certain spots of the fabric to shrink down, but this will only lead to a small amount of shrinkage.
What Happens If You Don’t Use Wool For Wet Felting?
If you don’t use wool for wet felting, then you will not be met with very satisfactory results at all. The reason wool is used is that it shrinks down when it dries, this is what allows it to bind together so significantly during the fulling process, making it the perfect material to use.
This is also why woolen sweaters are known for shrinking when you machine wash them!
Because wool shrinks when it dries after being wet, manufacturers have created specialized treated wool that is designed to not shrink at all, making it safe to wash your favorite woolen sweater.
However, many beginners in the world of wet felting end up purchasing treated wool, not realizing that it is designed to not shrink during the fulling process.
If you are making your start in the world of wet felting, we cannot emphasize enough how important it is that you do not purchase treated wool!
You should also check to make sure that the material you are purchasing for your wet felting project is actually wool, and not any other material, or any kind of synthetic wool. You will need pure wool if you want your finished project to shrink down just right.
Does A Wet Felting Project Need To Be Completed On The Same Day?
Wet felting can take quite a long time to finish, and you might be tempted to start another project right after finishing another one, but then quickly find yourself too tired to finish it off!
Luckily, you don’t have to worry about your project being ruined if you leave it overnight to pick it up the day after!
In order to leave a wet felting project to finish later, you will need to make sure you are not in the fulling process, and that you are still near to the felting process.
If you are simply using undyed wool, and no embellishments in your project then you can simply leave the wool as is, and then simply rehydrate it when you are ready to return to it.
However, we strongly recommend rinsing the project carefully to get rid of excess soap, and then lightly squeezing it to get rid of excess water, so that you can easily rehydrate it the next day, ready to keep working on it!
How Do You Wash A Wet Felting Project?
Once your wet felting project is completed, and you have used it to create items such as clothing, you may find yourself needing to periodically clean it of grime or stains. Luckily, this can easily be done, provided you wash it with care!
If you are trying to wash away some small messes from a wet felt project, such as some splatters from food, this can be done by simply wiping the affected spot with warm water.
If you need to clean the entirety of your wet felting project, make sure to do so by hand washing. Try to use plain soap and lukewarm water, and simply wash until the dirt has been removed from the surface of the project.
Once the project has been washed, all you then need to do is carefully squeeze the water out of it, and leave it to dry somewhere with a good airflow.
How Do You Care For Wet Felted Projects?
Luckily, you should not need to wash your wet felted projects very often, because felt is able to naturally repel dirt and water.
However, if you are using your felted project as an article of clothing, or as something like a bag, then you may need to wash it occasionally to get rid of accidental spills and stains.
When washing your project, just make sure to use lukewarm water, and neutral soap to quickly soak it.
If you have created wet felting projects to be used as decorations in your home, then you can simply leave them where they are, and dust them periodically, so that they do not become susceptible to dirt.
Try to keep them out of reach of young children who may be able to get them messy!
To Wrap Up
There you have it! Though getting started in wet felting can seem daunting to start with, provided you collect the right equipment and approach the project with care, then you can easily create wet felting projects that will look totally perfect, and be very durable.
Make sure to grab the right kind of wool, and not any kind of treated wool, because ordinary wool will shrink in the desired way, allowing it to bind together nice and tightly, so you can trust your felted project to stay together when in use.
Make sure to also not rush the process of wet felting, to allow the fibers to bind together perfectly, and to allow the project to dry and shrink perfectly, to create a fulled wet felting project you will remember.
Once your wet felted project is complete, you can rest assured that it will be very low maintenance, thanks to the fact that wool naturally repels dirt and water, which helps to keep it clean.
If you do need to wash it, just make sure to use lukewarm water and some very neutral soap that won’t risk damaging the integrity of your project! Try to keep felted projects in a cool and dry place, away from the reach of children!
Frequently Asked Questions
Can You Wet Felt Raw Wool?
Absolutely. In fact, you want to avoid felting with treated wool, because such wool will not be able to shrink, keeping it from achieving the hardiness you are looking for.
Can You Wet Felt With Cold Water?
Generally, you should use warm or hot water for wet felting, because the heat helps to cause the wool to be shocked, which is what allows it to bind together effectively.
Do You Need Soap To Wet Felt?
You should try to use soap when wet felting because the soap can change the pH balance of the wool, which allows the fibers to bind together more effectively.

In an effort to get them to avoid excessive screen time ( and arguing! ) I turned to more creative avenues that we have all since grown to love.
I created this website in the hopes of inspiring more families out there to enjoy crafting and enjoy a shared bonding experience over it.
Please enjoy it and hopefully, you’ll find something to make that you can display proudly forever!
- Master Crochet Stitches for Cozy Creations - January 23, 2024
- Half Double Crochet Guide for Cozy Creations - January 23, 2024
- Elevate Your Space with Unique Macrame Creations - January 23, 2024
