Have you ever wondered how to make your own jewelry? Many people don’t even give it a go because they think it will be too hard. It is such a fun hobby and a great way to make gifts for you and your loved ones.
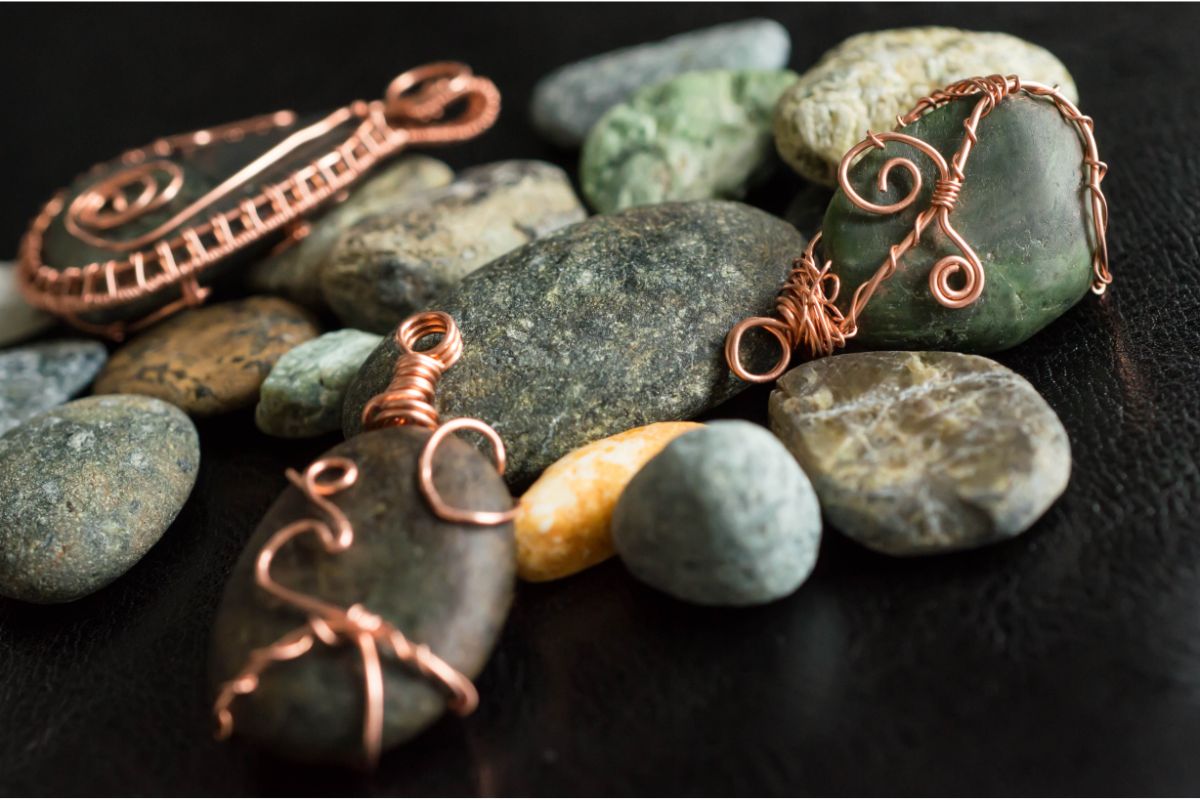
With our simple guide, anyone can learn how to wire-wrap stones to form beautiful pendants without having to make any holes or use too many complicated tools.
Choosing Your Stones
Use any kind of gemstone you like, but we would recommend starting off with a pebble or stone from outside to start off with. Once you’ve mastered the techniques here, you can try using fancier stones or crystals of your choice.
What You’ll Need
- Stones (pebbles to start off with)
- 30” of 20 gauge copper wire
- 20” copper wire – 26 gauge (split into 6” and 14” strands)
- Jewelry pliers (needle nose, round nose)
- Wire cutters
Instructions – Beginner Level
Let’s get started.
Step One
First of all, you’ll need to measure your 20 gauge wire and cut it into 10” segments so you have 3 different strands of wire.
Step Two
Take the 6-inch piece of 26 gauge wire and begin to wrap it around the middle of one of the main wires (10” of the 20 gauge).
Step Three
Stack the other two base wires along with this one, beginning to wrap the wire around all three (see also “How To Make Wire Jewelry For Beginners“). Keep going until the wire has been wrapped around all three between 14-15 times (see also “Wire Wrapping Crystals: How To Make Crystal Jewelry“).
Finish off this segment by wrapping the wire around the top base wire.
Step Four
You should have some excess on either side of the cluster of wires. Trim this off with a pair of needle nose pliers. Tuck the ends in using the same pliers. This should give you a nice neat wire section wrapped around 3 larger wires.
Step Five
Use your fingers to start to bend the main mass of wires so that the wrapped wire you just did is in the middle of the bent u-shape. Place your stone or pebble along the inside of the u-shape, ensuring it fits nicely in against the wire.
Start to bend the base wires around the stone so that the wires are closing together and encompassing the stone to keep it in place. Then remove the stone from this nook to ensure the base wires are not crossed over one another.
Step Six
Take the other piece of the 26 gauge wire (14” size) and wrap it around the point where all the base wires touch. Do this around 5-6 times to join the formation together properly.
Step Seven
Bring the end of this wire around the top of the three base wires and bring it through the loop. Cut off the excess using wire cutters and tuck in the end with needle nose pliers.
Step Eight
Establish which side is going to be the front of the jewelry and bend the two front wires (equal to one main wire bent in half) forward. Using the other end of the 26 gauge wire, start wrapping around these two base wires between 4-5 times.
Step Nine
Add the stone back into the frame, with the front facing upward. Use your fingernail to gently separate the top wire that is surrounding the stone from the rest of the wires. With the needle nose pliers, make a kink in the wire. Repeat this on the other side of the stone.
The front of your pendant should have one wire with a kink in it on either side, going across the center of the stone.
Step Ten
Repeat this process on the back of the pendant, using your nail and the needle nose pliers.
Step Eleven
Hold your pendant so the back is facing you. take the first two main wires (these are the same 20 gauge wire you bent in half earlier) and bend them all the way forward. Using wire cutters, trim the excess wire leaving about ¼” left.
Step Twelve
Take the needle nose pliers and bend the newly cut ends of the wire so they aren’t sticking out. They can be bent in a downward motion, so they curl under themselves if easier.
Step Thirteen
Take the other two wires (the middle ones) that aren’t wrapped and bent them forward just as you did with the last two. Cut these and bend them using the needle nose pliers again.
Step Fourteen
Turn your attention back to the base wires that have already been partially wrapped. Using the 26 gauge wire that’s still attached, keep wrapping around both base wires. Make sure these wires don’t cross each other as you go.
Keep going for around an inch and then trim and tuck the excess with pliers.
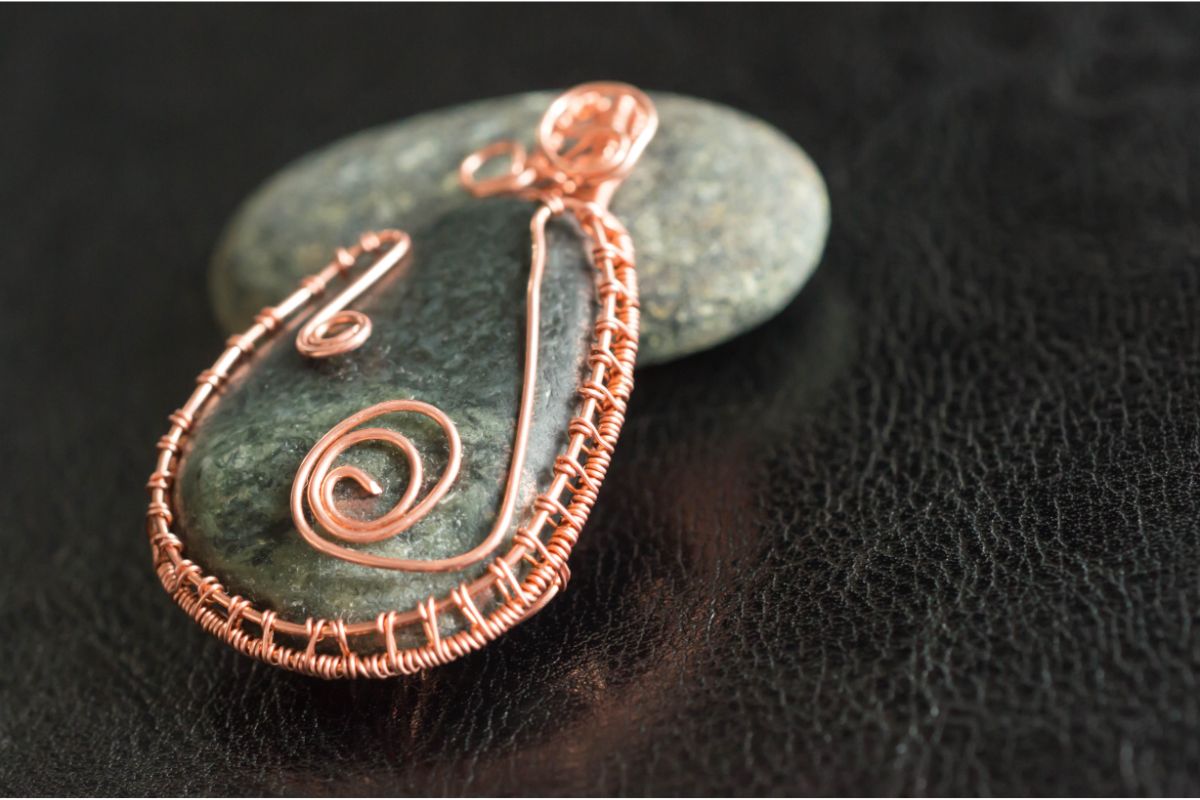
Step Fifteen
Take a pair of round nose pliers and start to form the bail of the pendant. The bail is the small metal piece that attaches the pendant to the chain of a necklace. To do this, you need to bend the wrapped long part of the wire down over the back of the pendant.
Step Sixteen
Split the base wires (with the wrapping over them) so they are at a right angle to the pendant.
Step Seventeen
Bend the wires so they are now sticking out at the front side of the pendant. Take one wire and make a full wrap around the bail area so the end of the wire is back at the front. Repeat with the other wire.
The ends of both wires should now be at the front of the pendant in a sort of ‘s’ shape.
Step Eighteen
Take the wire cutters and trim the excess off, leaving about ½” on either end. Then take the round nose pliers and form spirals at each end of the wire.
The Bottom Line
There you have it! The ultimate beginner’s guide to making wire-wrapped jewelry without the need to drill any holes.

In an effort to get them to avoid excessive screen time ( and arguing! ) I turned to more creative avenues that we have all since grown to love.
I created this website in the hopes of inspiring more families out there to enjoy crafting and enjoy a shared bonding experience over it.
Please enjoy it and hopefully, you’ll find something to make that you can display proudly forever!
- Master Crochet Stitches for Cozy Creations - January 23, 2024
- Half Double Crochet Guide for Cozy Creations - January 23, 2024
- Elevate Your Space with Unique Macrame Creations - January 23, 2024
