For those of you who have had the pleasure of owning a handmade piece of wire wrapped jewelry, you’ll know that this popular method of crafting creates some of the most beautiful jewelry.
There are endless ways to make jewelry using this technique, and it’s a highly enjoyable and diverting hobby to get into.
If you’re planning on getting started with your wire wrapping journey, then chances are that you’ve got a whole host of questions, most of which will be to do with the tools required for the job.
You need to make sure that you’ve got the correct items, as this will help you to create jewelry that’s of the highest quality and standard.
Below, we’ve compiled a handy guide that we hope will help you, providing all of the info on tools, supplies, and even some simple techniques to get you started. To find out more, simply keep reading below, as we take a closer look.
What Is Wire Wrapping?
Now, before we jump straight in and start listing off tools, let’s take a closer look at what wire wrapping is for those of you who don’t already know.
Wire wrapping is a popular technique for making jewelry, and involves taking a metal wire, and wrapping it around various beads and stones.
This is what allows the maker to create their jewelry pieces, and you can conduct all sorts of intricate designs using a wire wrap, putting an unique stamp on the pieces.
When the string of metal is wrapped, it becomes the foundation for the decorative items, and can even act as a design detail itself.
You can use a wire wrap to join beads together, or wrap around individual pieces such as tumblestones, in order to create items such as pendants.
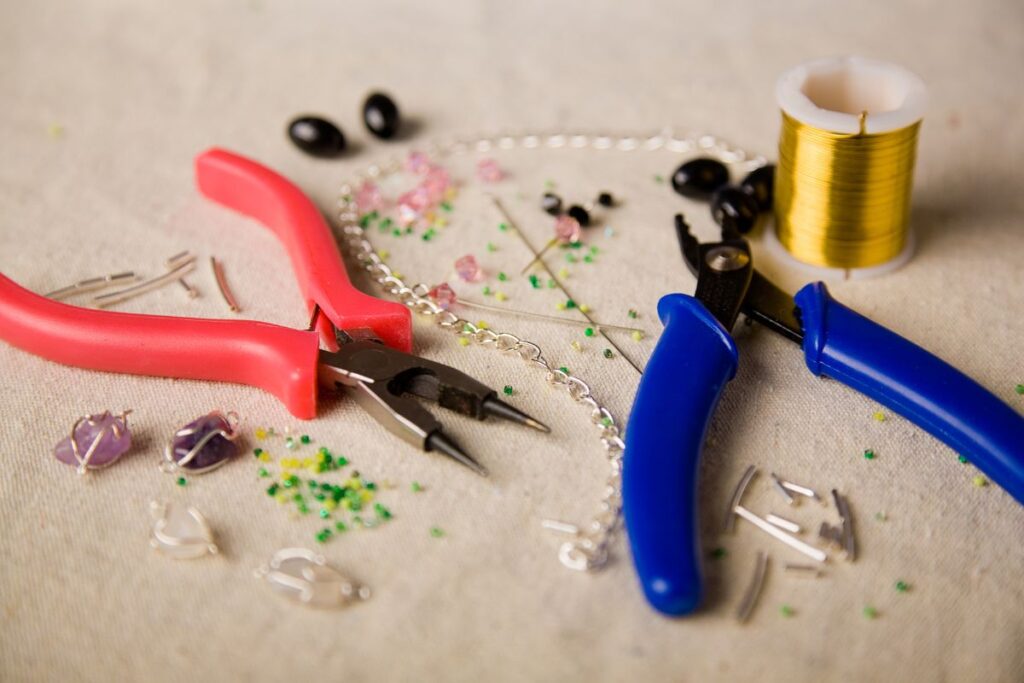
The Items You’ll Need To Get Started
Because there are quite a few tools that you’ll require to get started on your wire wrapping journey, we’ve divided our list into two sections. In our first section here, we’re going to be listing the items that are an absolute must, when it comes to wire wrapping.
These are items that you can’t do without, and every beginner will need to purchase them in order to get started. We’ve given a brief description of each, and the function that they serve during the wire wrapping process.
- Side Cutters – The first item on the list that you’re going to need to purchase are side cutters. There’s not much to explain here other than they’re the tool responsible for cutting your wire once you’re finished with your wrapping, or you need to adjust the length of your wire.
- Needle Nose Pliers – The next item on the list is a needle nose plier. If you’re not familiar with what these are, they’re essentially what keeps your wire steady and unbending whilst you’re working away at it. This tool helps to ensure that everything stays in place.
- Round Nose Pliers – Finally, the last thing that you’re going to need is a round nose plier, which is the tool responsible for making all of the intricate designs with your metal wire. It allows you to create lots of loops and curves in the wire.
These are all of the actual tools that you’re going to need for your wire wrapping, and are essential for the project itself. We’d like to point out that most of the time, these three items can be bought as a part of a kit containing all three.
You can get these in your local craft center, or they can be bought ubiquitously online.
The Additional Items You Can Purchase
Now that we’ve covered the main items you’re going to need to get started on your wire wrapping journey, we can move on to discuss some of the additional items you can purchase.
Bear in mind that you won’t need all of these items at first, and they’re by no means a requirement. As you go along with the jewelry making process however, you may decide that you want to invest in some of these as your hobby progresses.
We’ve compiled a list of each of these additional items below, along with a description of their primary purpose and function.
Anvil
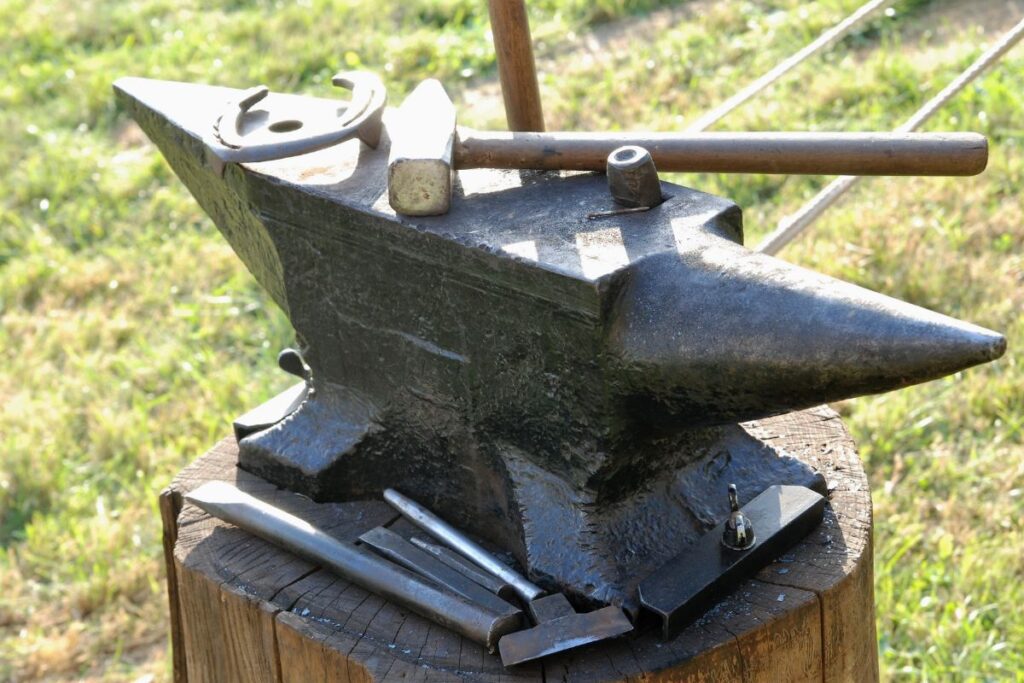
This may seem a little bit excessive when it comes to something as delicate and as intricate as wire wrapping, and an anvil probably seems a little bit overkill.
But we’re not talking about those massive anvils used for large metalwork, we’re talking about smaller, miniature sized anvils that can help you with your hammering.
These are surprisingly inexpensive, and they’re worth investing in, as you’ll probably decide that you need one for your workbench later down the road.
Nylon Jaw Pliers
Nylon jaw pliers are an additional type of plier that you can purchase to help you along your wire wrapping journey. So, what do these do that the basic three pliers don’t? Well, these ones essentially help you to straighten out your wire.
If you’re a beginner to the wire wrapping process, then chances are you’re going to make a lot of mistakes along the way. You’re going to wrap pieces of the wire, and realize that it’s not quite right, and need to straighten it all out again.
If you’ve already given this a try, then you’ll know that it can be super daunting trying to get it totally straightened out again, so we’d recommend that you invest in one of these tools.
They make the whole process much easier, and save you a lot of time and effort later down the line.
Flush Cutter
This is another item that you might not need right away, but will be useful when you start branching out with the type of jewelry that you’re making.
A flush cutter is essentially a tool that helps you to make a really solid, straight, and even cut in your wire. It helps to make the cut really smooth throughout, so that you don’t have any jagged points.
Some of you may be wondering what the difference is between a flush cutter, and a side cutter. Well, essentially, the difference is that flush cutters will cut your wire level throughout.
Side cutters, on the other hand, will cut at an angle. They provide an unbroken, even cut to the wire, so that you have a super clean and polished finish.
Step Pliers
The next tool that you might want to invest in later down the line is a step plier. Step pliers are great for when you want to make loops of varying size with your wire.
They help you to easily bend your wire in a neat loop, so that you don’t need to worry about getting them perfect yourself.
One side of the wire will be completely smooth and flat, whilst the other side will have a total of three round notches. These notches will vary in size, and will be used for wrapping your wire around the surface of the tool.
This will help you to create different sized loops in your project.
A Hammer
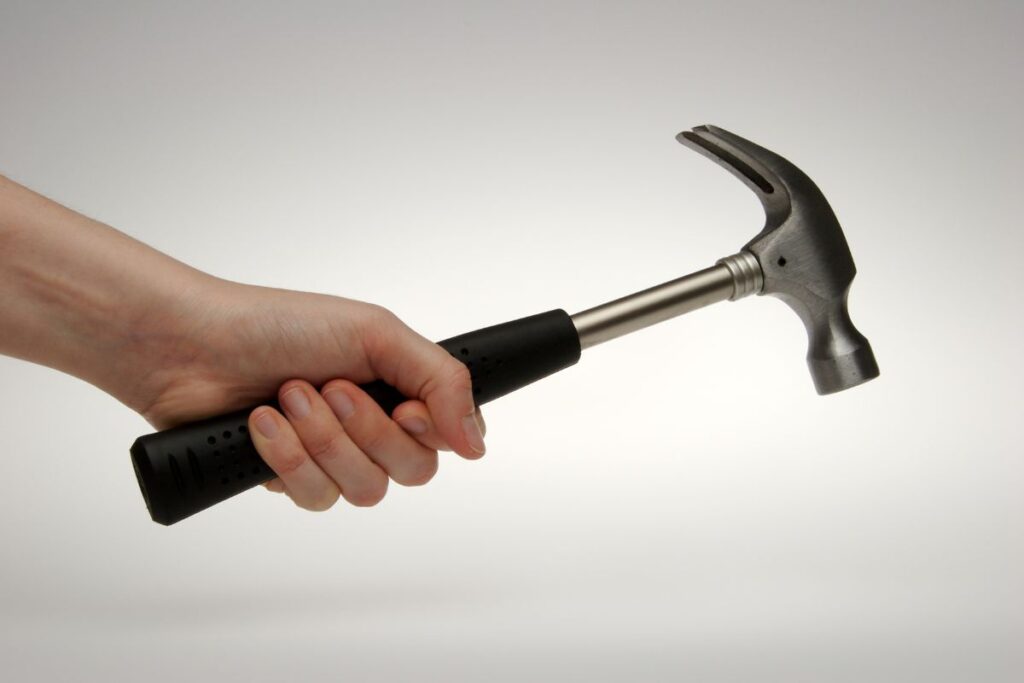
The next thing that you’re probably going to need later on in your wire wrapping journey is a simple hammer.
The type of hammer you purchase will vary from person to person, with some people opting to purchase a simple chasing hammer for the job, and others choosing a rubber based hammer instead.
Either way, purchasing these items will help you to flatten out your wire when you need to. Out of these two, we would recommend starting out with a rubber hammer, simply because it’s easy to mark your wire if you’re inexperienced using these kinds of tools.
Rubber hammers are excellent for flattening everything out, or creating ridges in your wire, without actually damaging it.
Wire Gauge Tool
Some of you might be wondering what to do if you have some scrap pieces of metal that you think would be perfect for wrapping, but you just don’t know what the size of it is.
If this is the case, don’t worry, because there’s actually a handy tool that you can purchase for this purpose. Wire gauge tools are used for measuring a piece of metal, and this will tell you how thick they are, and whether or not they’ll work well for the purpose you’ve intended.
Lortone Tumbler
The last thing that we’d recommend that you invest in further down the line is a lortone tumbler.
Bear in mind that these are expensive, and they’re not absolutely necessary for wire wrapping, but they might be a good investment if you’re serious about your projects, and plan on selling your jewelry one day.
Lortone tumblers are essentially responsible for shining and polishing your jewelry, until it looks as fresh and new as possible. These tools last for an incredibly long time, and they’re a good investment for small businesses.
How Do I Choose The Right Kind Of Wire?
Chances are that if you’ve been on the hunt for some wire to do all of your jewelry based wrapping with, that you’ve found that these come in a whole host of different sizes.
Therefore, it can be difficult to know where to begin. How do you choose a string of wire that will be the perfect size for your jewelry?
If you’re just getting started out, then we’d recommend that you opt for a wire that has a gauge of approximately 18 – 25. This is perfect for beginner level jewelry makers, as it’s not too thin so that you struggle not to overbend, and it’s not too dense either.
Bear in mind that the higher the gauge number, the thinner the wire itself may be.
You may still have some questions regarding the selection of your wire however, as there are also a number of different materials out there to choose from. For example, you can purchase copper based wires that have a red metallic finish.
You can also purchase brass, and even real silver wires to start working with. As a beginner however, we’d recommend that you start off with a non-tarnishing wire. You can purchase these in a few different materials, with stainless steel being the most popular.
At the beginning, chances are the jewelry you’re making won’t be perfect, so it’s good to start out with a material that isn’t too expensive to buy in bulk.
What Items Should I Use To Wrap?
Now that we’ve discussed the wire you’re going to be using for your projects, we can move on to discuss the items that you’re going to be wrapping. If you take a look on the internet, there are a whole bunch of different items that have been used within wire wrapping.
Some of the most impressive ones feature crystals that come in incredibly unique shapes, and some intricate wrapping has been conducted in order to incorporate them.
But, if you’re just starting out, we think that one of the best things you can choose to get practicing are some simple gemstones. You can purchase beaded gemstones ubiquitously online, and they typically come in a simple spherical shape.
They come in an array of different colors, and you can have fun mixing and matching them, until you find a combination that you like.
One of the best things about beaded gemstones is that they also typically have a hole running through them. This allows you to insert the wire into the hole, and then perform your wrapping.
It’s much easier to get started with beads, as you don’t have to worry about the item slipping or moving around whilst you’re doing your wrapping.
After you’ve spent some time practicing with beads, you can then move on and start wrapping some items that don’t contain holes in the surface of them.
You can have fun choosing some different tumbled stones and learning some of the best ways to wrap them. Later down the line, you can really get creative and start perfecting some intricate designs yourself.
Final Thoughts
To sum up, there are only a few basic tools that you need to get started with wire wrapping. As you progress in your jewelry making journey, you might want to invest in a few additional cutters and tools that can help you to progress.
We hope that you’ve found this article helpful, and we wish you the best of luck in your wire wrapping projects.

In an effort to get them to avoid excessive screen time ( and arguing! ) I turned to more creative avenues that we have all since grown to love.
I created this website in the hopes of inspiring more families out there to enjoy crafting and enjoy a shared bonding experience over it.
Please enjoy it and hopefully, you’ll find something to make that you can display proudly forever!
- Master Crochet Stitches for Cozy Creations - January 23, 2024
- Half Double Crochet Guide for Cozy Creations - January 23, 2024
- Elevate Your Space with Unique Macrame Creations - January 23, 2024
