Are you looking for a fun and engaging activity to keep your kids entertained while also fostering their creativity and fine motor skills? Look no further than paper crafts! In this blog post, we’ll guide you through a delightful craft project that will captivate your little ones: Rainbow Paper Crafts
Rainbows have always fascinated children with their vibrant colors and enchanting arcs stretching across the sky. By combining the joy of rainbow imagery with the hands-on experience of cutting and pasting, this activity provides a fantastic opportunity for kids to unleash their artistic side while developing important dexterity and coordination skills.
With our easy-to-follow 3-step guide, you’ll discover just how simple and enjoyable it can be to create a beautiful rainbow masterpiece together with your children. So gather your craft supplies, roll up your sleeves, and let’s dive into the world of colorful creativity!
Supplies Needed
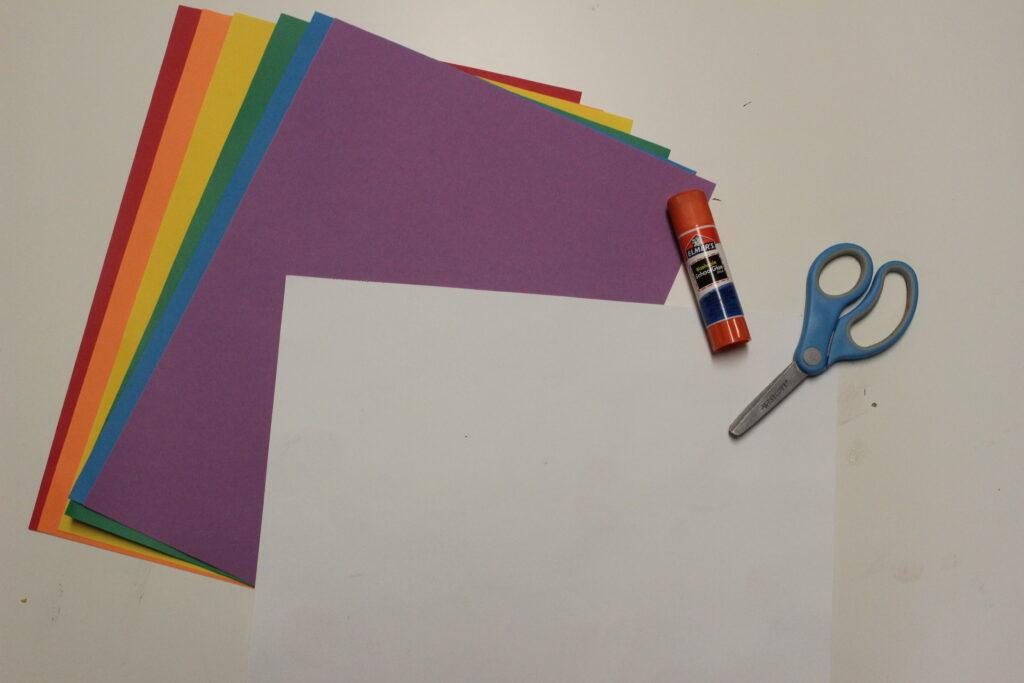
To get started with the Rainbow Paper Crafts kids’ activity, you’ll need a few simple materials that are easily accessible. Here’s a list of what you’ll need:
- Red, orange, yellow, green, blue, and purple construction paper: These vibrant colors form the basis of our rainbow craft. Construction paper is an ideal choice as it is sturdy enough for cutting and pasting, and its bright hues will make the rainbow come to life.
- Kid scissors: It’s important to provide child-safe scissors that are appropriate for your little one’s age and skill level. These scissors usually have rounded edges and a blunt tip, ensuring safety during cutting exercises.
- Glue stick: A glue stick is a convenient and mess-free adhesive option for kids. It allows them to easily apply glue without the worry of spills or sticky fingers. Make sure to choose a non-toxic glue stick that dries clear.
- White card stock: The white card stock serves as the base for your rainbow creation. It provides a sturdy foundation for the colorful construction paper strips and helps showcase the final artwork.
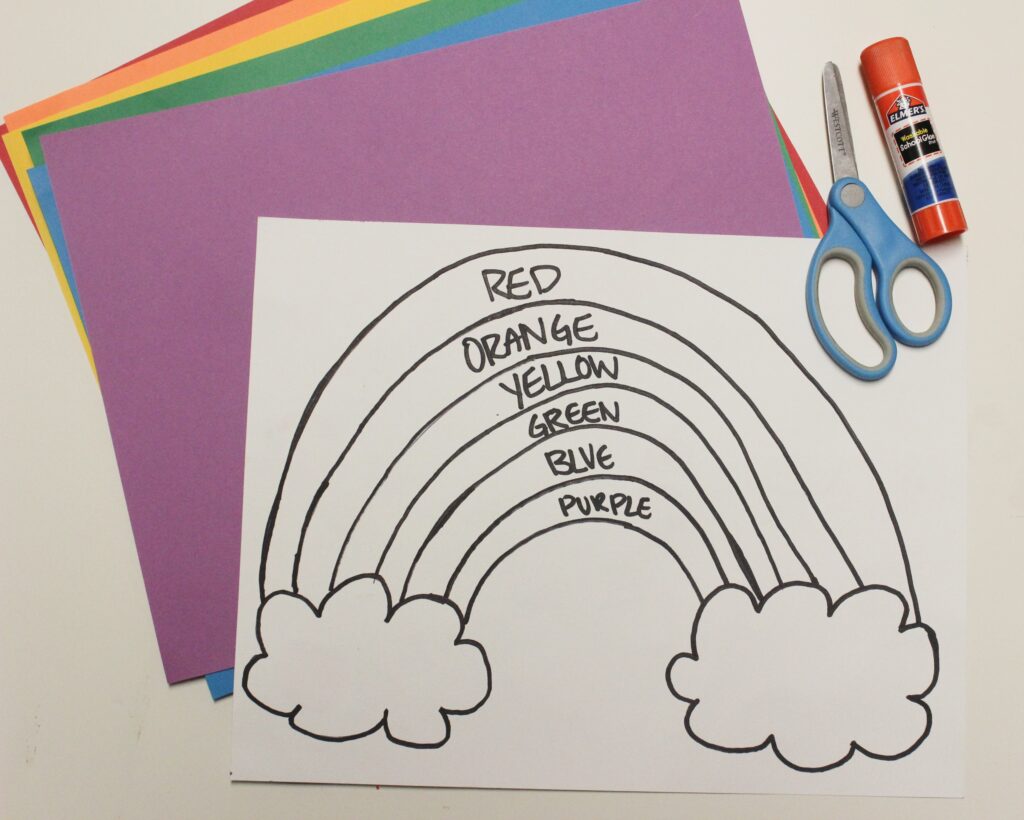
- Permanent marker: A permanent marker is handy for drawing an outline of the rainbow on the white card stock. It provides a clear guide for your child to follow while assembling the rainbow strips.
With these supplies in hand, you’re well-equipped to embark on a colorful adventure with your kids. Remember, if you don’t have all the exact materials listed, feel free to get creative and make substitutions using what you have available. The goal is to engage your children in a fun and educational craft experience while unleashing their creativity. So gather the supplies and let the rainbow-cutting and pasting begin!
Directions
Let’s dive into the step-by-step process of creating your beautiful rainbow masterpiece!
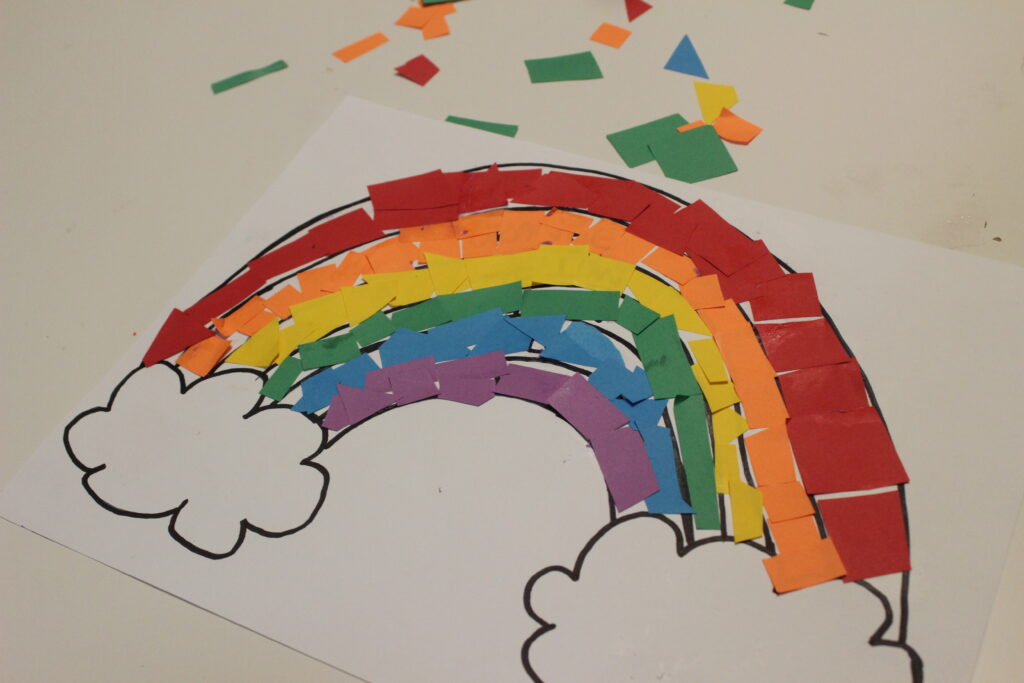
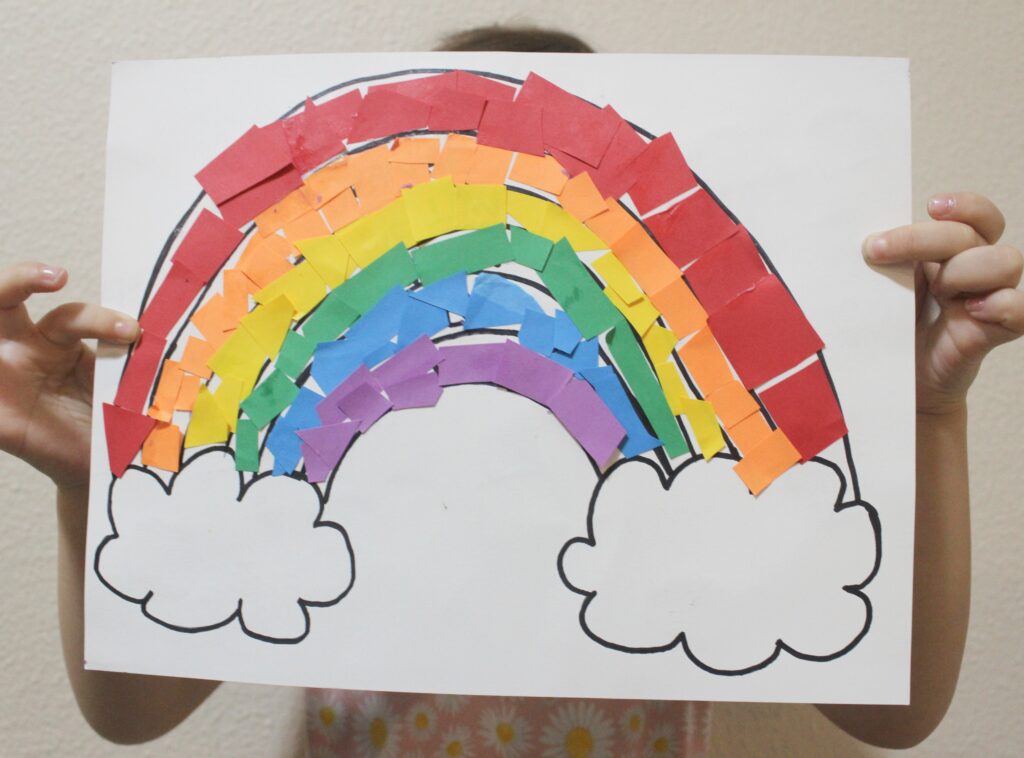
Step One: Draw out a rainbow with clouds on the white card stock: Using a permanent marker, draw a simple outline of a rainbow with fluffy clouds at both ends on the white card stock. This outline will serve as a guide for your child to follow while placing the colored squares.
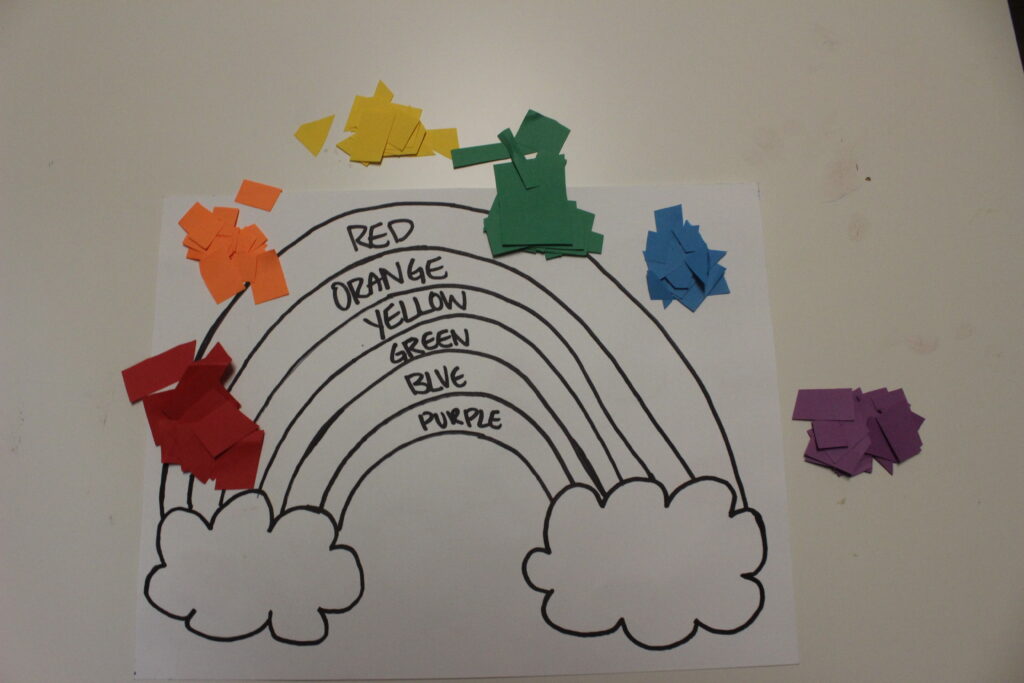
Step Two: Have your child cut up small squares of each of the colored paper: Provide your child with the red, orange, yellow, green, blue, and purple construction paper. Encourage them to use the kid scissors to cut small squares out of each colored paper. The size of the squares can vary, but aim for consistency to maintain a neat appearance.
Step Three: Kids can use the glue stick to glue on each of the colored squares onto the rainbow: Now comes the fun part! Instruct your child to take one colored square at a time and apply a small amount of glue from the glue stick to the back of the square. They should then carefully place the square onto the corresponding section of the rainbow according to the colors.
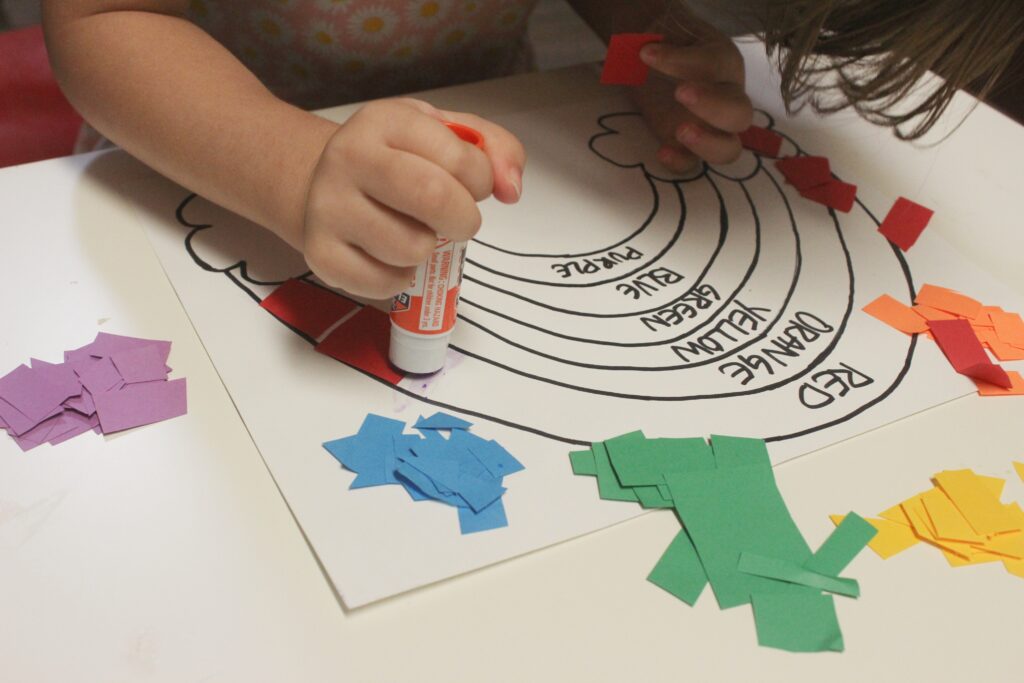
Encourage your child to follow the sequence of colors: red, orange, yellow, green, blue, and purple. They can start with one end of the rainbow and work their way to the other end. Remind them to press down gently on each square to ensure it sticks to the card stock securely.
Continue this process until all the colored squares have been glued onto the rainbow, filling it with a beautiful array of colors. The glue stick will help keep the squares in place and create a cohesive and visually appealing rainbow artwork.
As your child progresses through these steps, offer guidance and support, praising their efforts and creativity. This activity not only promotes fine motor skills but also encourages color recognition and hand-eye coordination.
Once the rainbow is complete, set it aside to dry. You can frame it or display it proudly, allowing your child to feel a sense of accomplishment and admire their colorful creation.
Enjoy this delightful craft project and watch as your child’s imagination takes flight through the magic of rainbows!
Tips and Tricks
Here are some additional tips and tricks to enhance your Rainbow Paper Crafts activity and make it even more enjoyable for your little ones:
- Kids can rip the paper as well to develop fine motor skills instead of cutting: If your child is still developing their scissor skills or if you want to introduce a different technique, allow them to tear the construction paper into small pieces instead of cutting. Ripping paper can also be a great way to strengthen their hand muscles and improve fine motor coordination.
- Use cotton balls to glue on the clouds for a sensory aspect to this activity: To add a sensory element to the craft, consider using cotton balls instead of drawing clouds on the card stock. Kids will enjoy the fluffy texture of the cotton balls and the tactile experience of gluing them onto the paper.
- This activity is great for toddlers and preschoolers to develop cutting skills and strengthen their fine motor muscles in their hands: Rainbow Cutting and Pasting is an excellent craft for young children to practice their cutting skills and enhance their fine motor coordination. The precise movements required for cutting and gluing will help strengthen the muscles in their hands, promoting dexterity and control.
- You can also use it to teach about the colors of the rainbow: Take advantage of this activity to introduce or reinforce color recognition. As your child works on placing the colored squares onto the rainbow, you can talk about each color, its name, and its position in the rainbow sequence. It’s a fun and interactive way to reinforce their knowledge of colors.
- You can also make a rainbow template if you don’t want to draw one yourself: If you prefer a more structured approach or want to save time on drawing the rainbow outline, you can easily find printable rainbow templates online. Print out a template that suits your desired size, and let your child place the colored squares or torn paper directly onto the template.
Remember to provide guidance and supervision throughout the activity, adapting it to your child’s age and skill level. Encourage creativity, exploration, and discussions about colors and shapes. Most importantly, have fun together as you embark on this colorful adventure!
By incorporating these tips and tricks, you’ll enhance the learning experience and make the Rainbow Cutting and Pasting activity even more engaging and interactive for your little artists.
How to Guide
Rainbow Paper Crafts Kids Activity
Equipment
- Red, orange, yellow, green, blue, and purple construction paper
- Kid scissors
- Glue stick
- White card stock
- Permanent marker
Instructions
- Draw out a rainbow with clouds on the white card stock.
- Have your child cut up small squares of each of the colored paper.
- Kids can use the glue stick to glue on each of the colored squares onto the rainbow.
Conclusion
Engaging children in creative activities like Rainbow Paper Crafts Kids Activity not only provides them with endless entertainment but also nurtures their development in various ways. Through this simple yet captivating craft, kids can sharpen their fine motor skills, improve hand-eye coordination, explore colors, and express their artistic abilities.
Whether your child is practicing their cutting skills or strengthening their hand muscles by tearing paper, this activity offers a range of options to suit their abilities. Additionally, incorporating sensory elements like cotton balls for clouds adds an extra dimension to the experience.
Rainbow Paper Crafts are particularly well-suited for toddlers and preschoolers, providing them with an opportunity to learn about colors and their sequence in a rainbow. By encouraging their creativity and offering guidance, you can foster their confidence and inspire a love for arts and crafts.
Remember, if drawing a rainbow outline seems daunting, printable templates are readily available, making the activity more accessible and time-efficient.
So, gather the materials, create a vibrant rainbow, and witness the joy and pride that fills your child’s eyes as they display their colorful masterpiece. As they develop their cutting skills, fine motor muscles, and color recognition, you’ll witness the growth of their creativity and confidence.
Make sure to cherish these precious moments spent together, fostering their imagination and bonding over the magic of rainbows. Happy crafting!

In an effort to get them to avoid excessive screen time ( and arguing! ) I turned to more creative avenues that we have all since grown to love.
I created this website in the hopes of inspiring more families out there to enjoy crafting and enjoy a shared bonding experience over it.
Please enjoy it and hopefully, you’ll find something to make that you can display proudly forever!
- Master Crochet Stitches for Cozy Creations - January 23, 2024
- Half Double Crochet Guide for Cozy Creations - January 23, 2024
- Elevate Your Space with Unique Macrame Creations - January 23, 2024
