Paper roses are so cute to look at, and they’re not even that difficult to make. We used to make them when we were kids in school.
However, have you ever made a paper rose that is almost 28 cm in diameter?
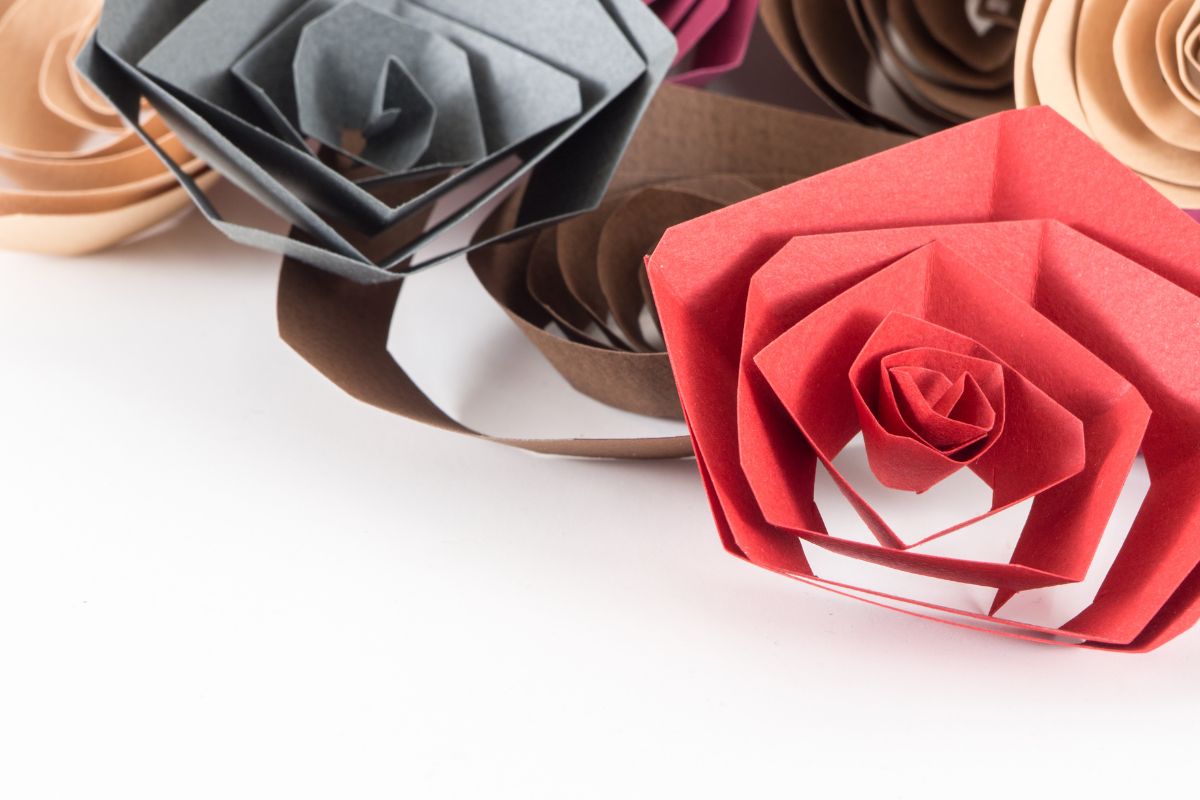
If you want to learn how to make some big paper roses, look no further. In this guide, we have list our own step-by-step instructions on how to make your very own huge paper roses at home.
So, let’s get started!
Materials Needed To Make Big Paper Roses
In order to make big paper roses by hand, there are a handful of materials and tools that you will need on hand.
You are going to need:
- 65 lb card stock of your chosen color (we recommend pink or red)
- A pair of scissors
- A glue gun or a glue stick
A glue gun would be easier to use, as you are going to have to use a lot of glue on narrow, hard-to-reach areas while folding and positioning your petals. It wouldn’t be impossible to complete the craft with a glue stick, but it will be a lot trickier.
We mentioned that we recommend using pink or red card stock, but that is only because roses are typically found in red and pink.
There is no reason that you can’t get creative with your design, and choose your favorite colors to create a rainbow of petals. The decision is yours!
A Step-By-Step Guide For Making Big Paper Roses
Now that you know what materials and tools you will need for this project, you can begin to prepare for creating your very own big paper roses.
Below, we have listed an easy to follow step-by-step process on how to create big paper roses. Without further ado, let’s jump right in!
Here is how to make your very own big paper roses at home.
Step 1: Prepare The Petals
The first thing you will need to do, while making your big paper roses, is to prepare the petals. This means measuring them out, sketching out templates, and cutting them out individually.
You are going to have to cut out a grand total of 18 petals, each of different sizes. Each petal will be the same shape – similar to a balloon, but with a wider bottom section – but they will vary in size.
There are 4 petal sizes that you will need to make, along with two centerpieces and two bases.
The centerpieces should be shaped like four-leaved clovers (without the stems), while the one base should be shaped like a pentagon, and the other shaped like a perfect circle.
You will need to cut these out at the correct sizes for them to fully fit together.
Below, we have created a table that will show you how many petals and bases you will need to create of each size.
| Amount of Pieces | Petal Size | |
| Large petals | 14 | 14.2 × 13 cm |
| Small petals | 4 | 11.5 × 11.2 cm |
| Small centerpiece | 1 | 17 × 17 cm |
| Large centerpiece | 2 | 19 × 19 cm |
| Round base | 1 | 9 cm |
| Pentagon base | 1 | 4 cm |
Once you have cut each of these pieces out, using the scissors, cut 5 cm into the petal through the center of the bottom.
Overlap the slit by around ¼ an inch to create a curved shape, and use your glue gun or glue stick to stick the slit down.
Once you have made each petal into a curved shape, you can begin to assemble them. There should be 23 pieces altogether: 18 petals, 2 centerpieces, and 2 bases.
Step 2: Assemble The Rose
Next, you will need to grab your glue gun or glue stick, and start sticking each of the pieces together. Follow this step-by-step guide, and read carefully to complete the project.

- Pick up the circle base and 5 × large petals. Carefully assemble the petals so that they circle the base, leaving a small space in the center. These petals should be slightly overlapping each other.
- Glue the petals to the circle base, remembering to leave a small space in the center. You can use the pentagon base as a guide, leaving a small gap between the bottom of each petal and the pentagon base.
When glued down, the petals should have created a pentagonal shape in the center of the circle base, slightly larger than the pentagon base.
- Next, glue the pentagon base into the center of the circle base, in the middle of the first layer of petals. You will want the corners of the pentagon to face the lines that make up the bottom of the petals, so the pentagon is sideways in comparison to the space in the middle.
- You can now use the pentagon as a base to place the second layer of petals. Grab 5 × large petals, and position them so that their bases are mirroring the edges of the hexagon base. They should be overlapping each other more than the first layer of petals, and should be a lot closer together.
- Glue the second layer of petals down, and allow them to dry.
- Next, grab the final 4 × large petals, and position them to create a third layer. The petals should form a similar shape to a four-leaf clover. Glue them down onto the circle base, overlapping them.
At this point, you should see the shape of the overall rose forming!
- The third layer of petals should have created a bowl-like shape. Inside this bowl structure, you will need to glue down the 4 × small petals, creating an even smaller bowl-like structure. This will be the base of your rose.
- Next, pick up the centerpieces. Starting with the small one, curl the petals against the edge of the table you are working on by carefully dragging them against the edge.
- Create a small cone using one of the petals of the small centerpiece, curling it vertically. Use glue to keep it upright, making sure that the end of the cone has a perfect point.
- Carefully grab the ‘petal’ opposite the one you made into a cone, and wrap it around the cone. Make sure that this curled petal is straight, and then glue it into place.
- Repeat the curling with the third petal, and then the fourth petal, ensuring that these three petals are ‘hugging’ the cone. This will be used as the center of the rose.
- The base of the small centerpiece should now be shaped like a square. Glue this onto the center of one of the large centerpieces, and repeat the ‘hugging’ process using the petals of this large centerpiece, adding more layers.
- Using the final large centerpiece, repeat the process, but make these petals a little looser than the previous ones, creating a slightly wider appearance.
- Finally, you can glue this structure into the center of the base of the rose that you made earlier. Once dried, you will have your finished paper rose.
Step 3 (Optional): Add Leaves
While this isn’t technically necessary for this project, you could always cut out some leaf shapes out of green card stock to create leaves for your big paper rose.
We recommend measuring your leaves so that they are, roughly, 14 cm in diameter, although you can create leaves in various shapes and sizes if you prefer.
Simply cut them out, and glue them to the bottom of the petals of the rose!
Final Thoughts
Once you have made your first big paper rose, you will realise how easy it is to do. It is also pretty therapeutic to do, as it only takes a small amount of concentration, but a lot of craftiness overall.
If you like the idea of making your very own big paper roses, why not give it a try? Grab some card stock, scissors, and a glue gun, and get crafting!
We hope you found this article helpful.

In an effort to get them to avoid excessive screen time ( and arguing! ) I turned to more creative avenues that we have all since grown to love.
I created this website in the hopes of inspiring more families out there to enjoy crafting and enjoy a shared bonding experience over it.
Please enjoy it and hopefully, you’ll find something to make that you can display proudly forever!
- Master Crochet Stitches for Cozy Creations - January 23, 2024
- Half Double Crochet Guide for Cozy Creations - January 23, 2024
- Elevate Your Space with Unique Macrame Creations - January 23, 2024
