In today’s post, we will guide you through the mesmerizing world of how to make lava lamps, while also providing a fantastic activity to enjoy with your toddlers! If you’ve ever been captivated by the hypnotic glow and rhythmic motion of these unique decorative pieces, then you and your little ones are in for a treat. In this step-by-step guide, accompanied by captivating photos, we will unravel the secrets behind creating your very own lava lamp while engaging your toddlers in a fun and educational activity.
Engaging toddlers in sensory experiences is essential for their cognitive development, and making lava lamps together provides an exciting and interactive way for them to learn about color mixing and cause-and-effect. Watching their eyes light up as they witness the magical interaction of oil, water, and vibrant colors will undoubtedly create unforgettable moments for both of you.
With our detailed instructions and captivating photos, you’ll have all the tools you need to turn this DIY project into a delightful bonding activity with your toddlers. So, grab your little ones’ tiny hands, put on your creative hats, and let’s dive into the wonderful world of homemade lava lamps together!
Supplies Needed
Before you get started creating your very own lava lamp with your toddlers, let’s gather all the supplies you’ll need for this engaging DIY project.
Here’s a list of materials you’ll want to have on hand:
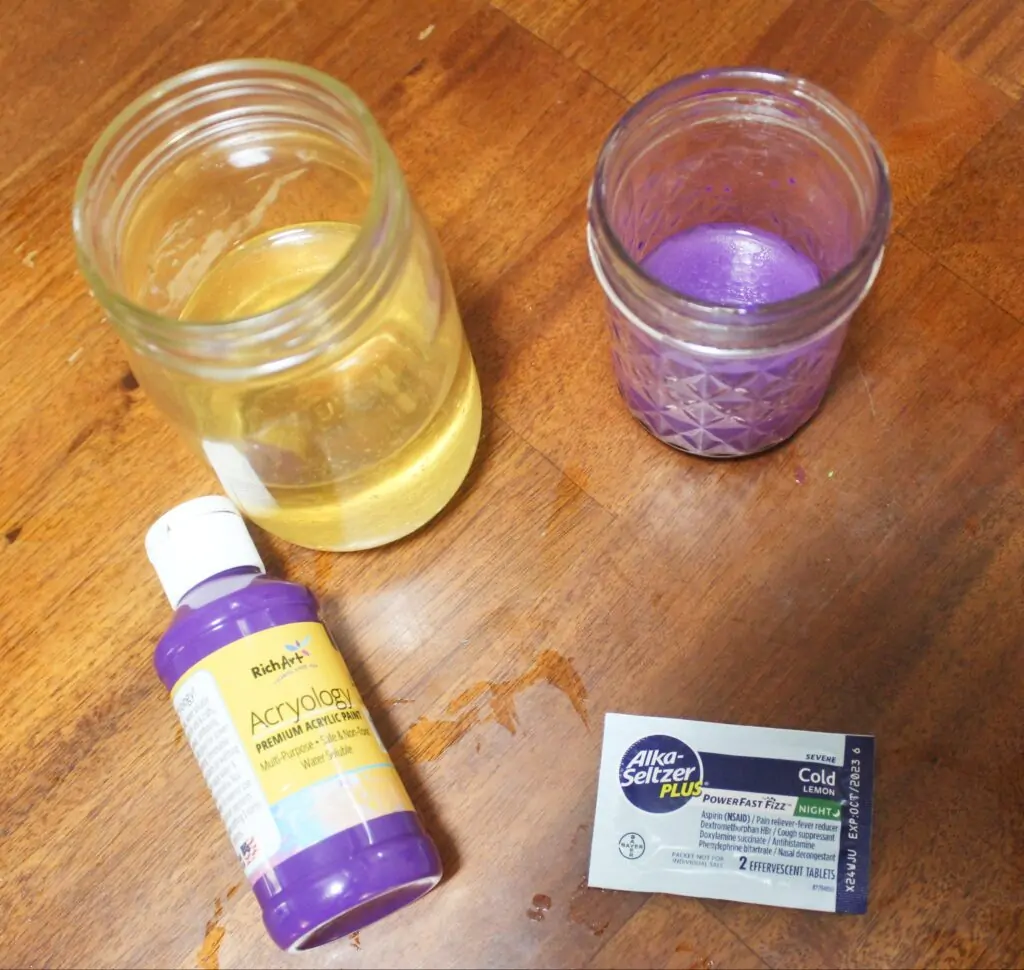
- Clear Plastic or Glass Containers: Look for transparent containers that are sturdy and safe for use with children. Glass jars or plastic bottles work well, as long as they have a tight-fitting lid.
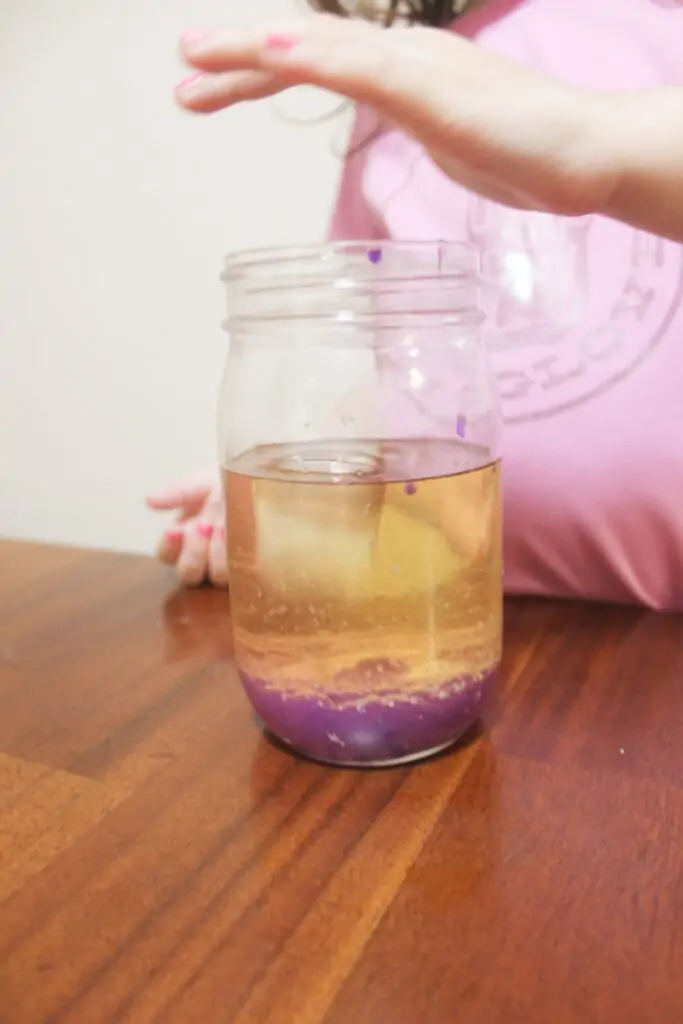
- Vegetable Oil: You’ll need a good amount of vegetable oil to fill the containers. Vegetable oil is an ideal choice due to its clear appearance and ability to float on top of water. We use coconut oil in this project however you will see it produces a slight yellow tint that can effect the clarity of the bubbles.
- Water: Fill the containers partially with water, leaving enough space for the oil to sit on top. The water will create the fluid medium for the lava lamp effect.
- Paint: Choose non-toxic, water-based paint in vibrant colors. These will serve as the coloring agent for your lava lamp. Make sure to select paints that are safe for children.
- Alka-Seltzer Tablets: These effervescent tablets will bring the bubbling action to your lava lamp. Make sure to break them into smaller pieces for better results.
- Optional: Glitter or Sequins: For an extra touch of sparkle and pizzazz, consider adding glitter or sequins to your lava lamp. These dazzling additions will enhance the visual appeal and captivate your toddler’s imagination.
With these supplies ready, you and your little ones are well-prepared to embark on this creative adventure of making lava lamps. So gather the materials, get your toddlers excited, and let’s dive into the step-by-step process of bringing these mesmerizing creations to life!
Jump to RecipeStep-by-Step Instructions to Make Home-made Lava Lamps
Get ready to dive into the exciting process of creating your very own lava lamp with your toddlers. Follow these step-by-step instructions and watch the mesmerizing lava lamp come to life:
Step 1: Fill your glass jar halfway with your chosen oil. This clear oil will serve as the main fluid in your lava lamp.

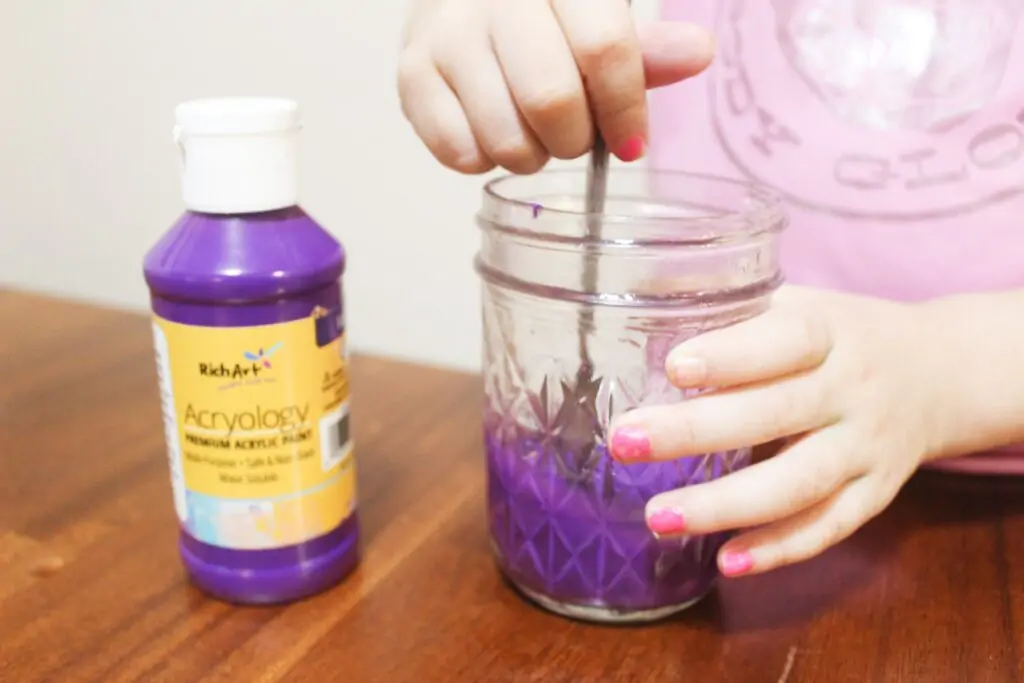
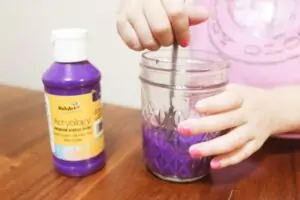
Step 2: In a separate container, mix a few teaspoons of paint with approximately ¼ cup of water for a 16 oz jar. Adjust the measurements accordingly if you have a different-sized jar. Stir the mixture well to ensure the paint is evenly distributed in the water.
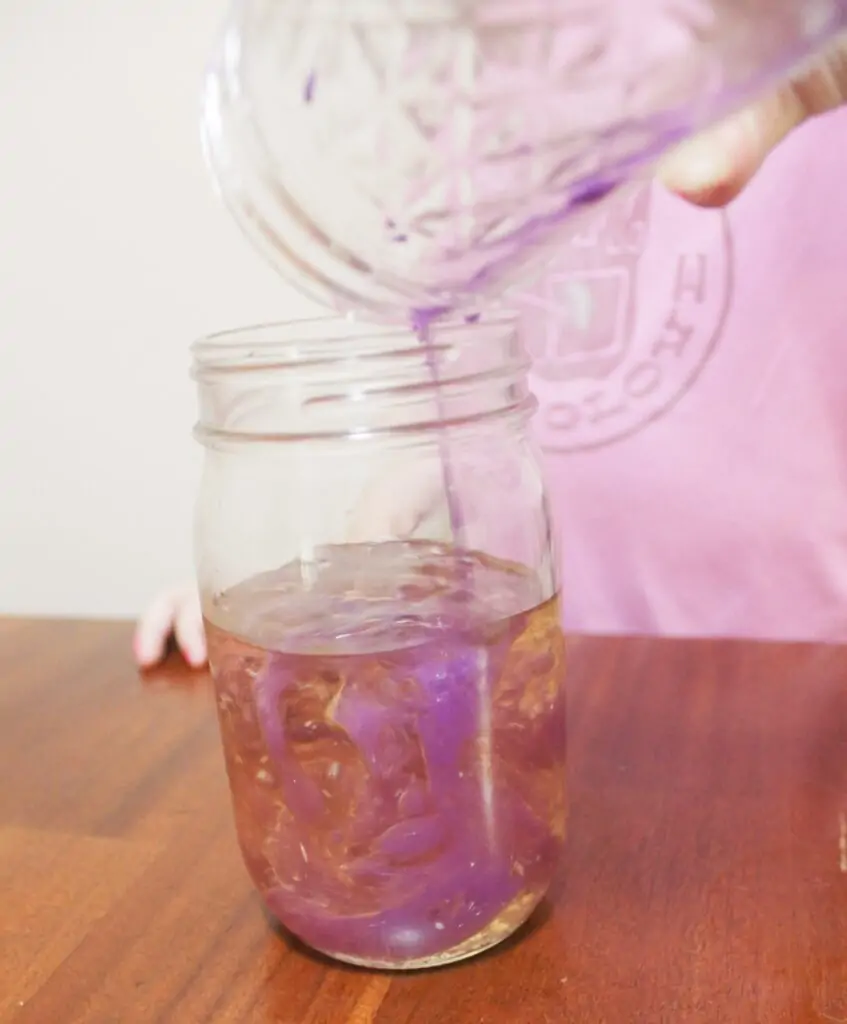
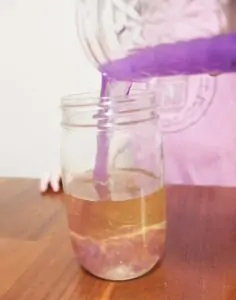
Step 3: Carefully pour the paint mixture into the glass jar, allowing it to settle at the bottom of the jar. The paint will create the vibrant colors for your lava lamp. Ensure you give it a little time and allow the paint to settle at the bottom of the jar. This will help create a clear distinction between the oil and the colored water.

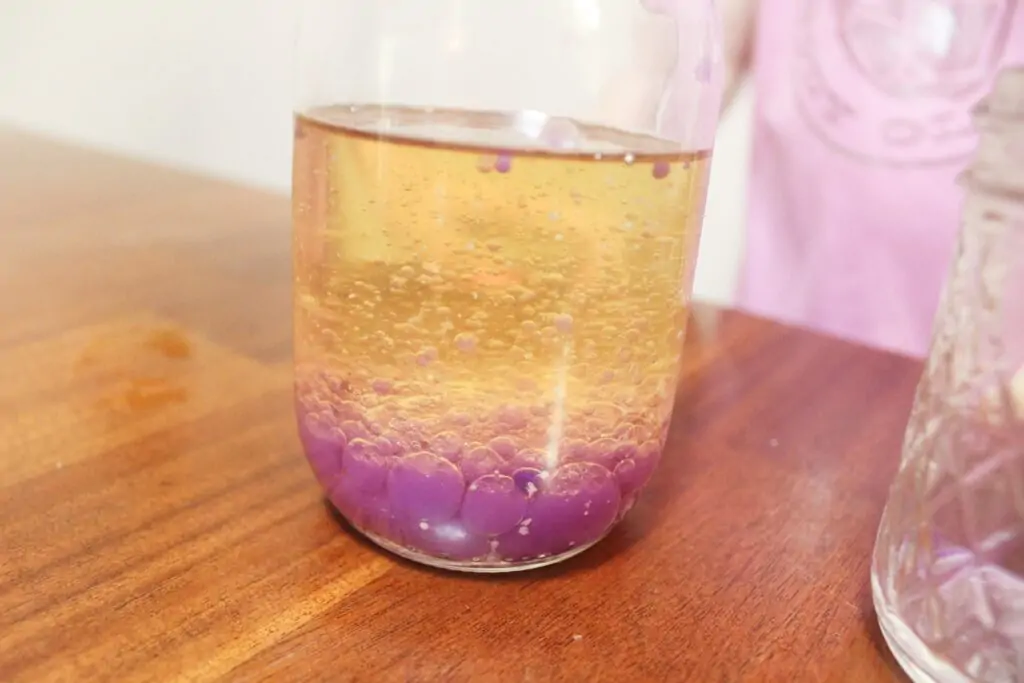
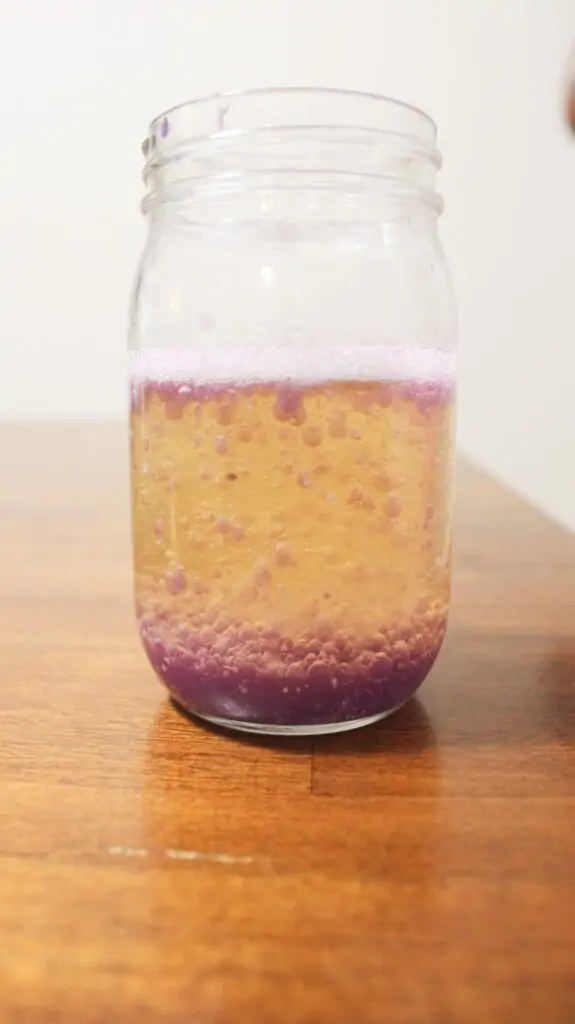
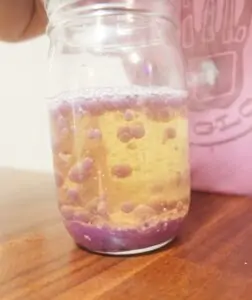
Step 4: Drop an Alka-Seltzer tablet into the glass jar and wait a few seconds. As the tablet reacts with the liquid, it will create a fizzing effect.
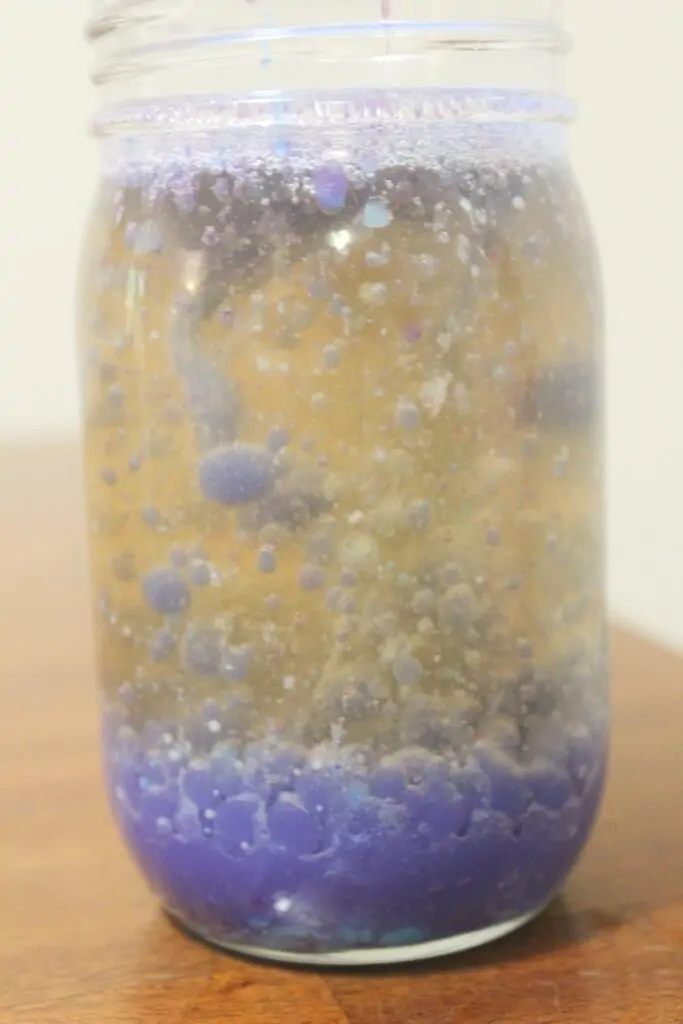
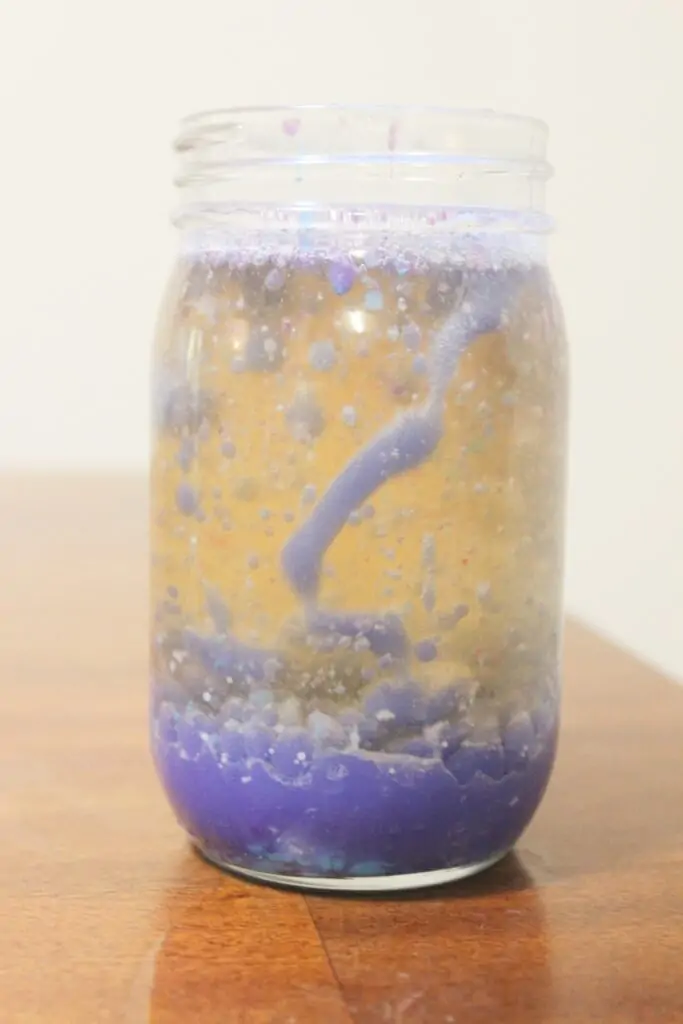
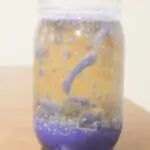
Step 5: Watch in awe as the paint bubbles and bounces up and down in the jar, creating a mesmerizing lava lamp-like effect. The colorful bubbles will rise through the oil and then sink back down, creating a captivating display.
Enjoy this magical experience with your toddlers as you observe the vibrant colors and the rhythmic motion of the bubbles. Take a moment to appreciate the fascinating interplay between the oil, water, and paint. Repeat the process as desired to create different color combinations and explore the captivating world of homemade lava lamps!
Home-Made Lava Lamp Tips and Tricks
- This DIY lava lamp activity is not only a fun craft but also a great science lesson for preschoolers and toddlers. It provides a hands-on opportunity to explore concepts like density and reactions. You can adapt the level of explanation and engagement depending on the age and understanding of your child.
- We used coconut oil which works well for this project, but as you can see it has a slight yellow tint that can affect the clarity of the bubbles. If you prefer a clearer look, you can use baby oil instead. Feel free to experiment with different types of oils to see how they affect the overall visual effect.
- The choice of paint color is entirely up to you and your child’s preferences. You can explore a wide range of colors to create different moods and effects. In this example, blue and purple were used, but feel free to get creative and try out different color combinations.
- Once the Alka-Seltzer tablet has finished reacting and the bubbles have settled, you can repeat the process for more fun. You can either add more paint to change the colors or simply drop in another Alka-Seltzer tablet to restart the bubbling action.
- If you’re using a smaller jar, adjust the amounts of water and paint accordingly. It’s important to leave some space at the top of the jar to allow for the bubbling action and movement of the liquid.
Get ready to have a blast while exploring the science behind lava lamps with your little ones!
Video Instructions
How to Make Lava Lamps
Equipment
- Glass Container
Materials
- Vegetable Oil
- Water
- Paint
- Alka-Seltzer Tablets
- Sequins optional
Instructions
- Fill your glass jar halfway with your chosen oil.Vegetable Oil

- In a separate container, mix a few teaspoons of paint with approximately ¼ cup of water for a 16 oz jar.Water, Paint
- Carefully pour the paint mixture into the glass jar, allowing it to settle at the bottom of the jar.
- Drop an Alka-Seltzer tablet into the glass jar and wait a few secondsAlka-Seltzer Tablets

- Watch and enjoy!
Video
FAQ
What supplies do I need to make homemade lava lamps?
1. Clear Plastic or Glass Containers
2. Vegetable Oil or Baby Oil
3. Water
4. Alka-Seltzer Tablets
5. Optional: Glitter or Sequens
How to make lava lamps?
1. Fill your glass jar half full of oil.
2. Mix a few teaspoons of paint with around ¼ cup of water for a 16 oz jar.
3. Pour the paint mixture into the glass jar.
4. Wait a bit for the paint to settle at the bottom.
5. Drop the Alka Seltzer into the glass jar and wait a few seconds.
6. Watch as the paint creates bubbles and bounces up and down in the jar like a lava lamp.
Conclusion
Congratulations on successfully creating your own mesmerizing lava lamps with your toddlers! This DIY project not only provided a fun and engaging activity but also served as a fantastic opportunity to teach your little ones about density, reactions, and the interplay between different substances. By witnessing the vibrant colors, bubbling action, and rhythmic motion of the lava lamp, your toddlers had the chance to explore and discover the wonders of science in an exciting and hands-on way.
Remember, you can continue the fun by repeating the process with different colors and experimenting with various oils. The possibilities are endless, allowing you and your toddlers to unleash your creativity and imagination. Whether you choose to use coconut oil or opt for clearer options like baby oil, the enchanting display of bubbles and colors will continue to captivate your child’s attention.
This DIY lava lamp activity not only provided a joyful bonding experience but also promoted cognitive development and sensory exploration in your toddlers. So, keep the creativity flowing, keep exploring, and keep discovering the wonders of science together. Engage in more interactive projects like this to create lasting memories and nurture a love for learning in your little ones.
We hope you and your toddlers had a fantastic time making your own lava lamps, and we look forward to bringing you more exciting DIY projects and educational experiences in the future. Enjoy the magic of your homemade lava lamps and continue to inspire curiosity in your children’s minds. Happy exploring!

In an effort to get them to avoid excessive screen time ( and arguing! ) I turned to more creative avenues that we have all since grown to love.
I created this website in the hopes of inspiring more families out there to enjoy crafting and enjoy a shared bonding experience over it.
Please enjoy it and hopefully, you’ll find something to make that you can display proudly forever!
- Master Crochet Stitches for Cozy Creations - January 23, 2024
- Half Double Crochet Guide for Cozy Creations - January 23, 2024
- Elevate Your Space with Unique Macrame Creations - January 23, 2024